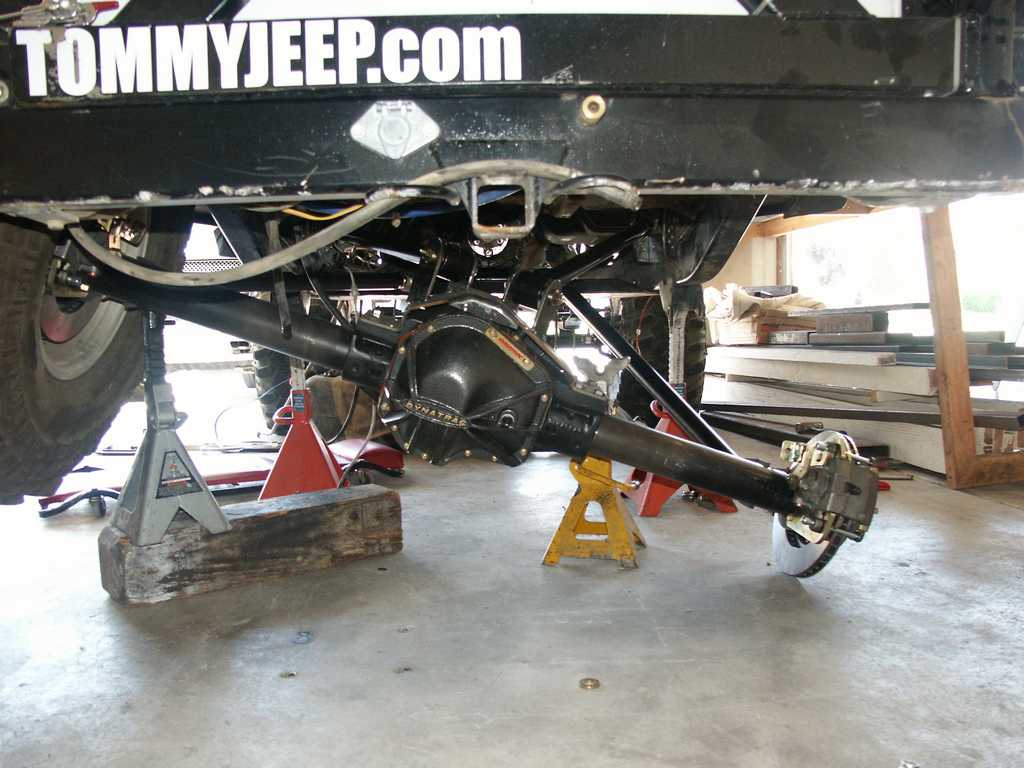
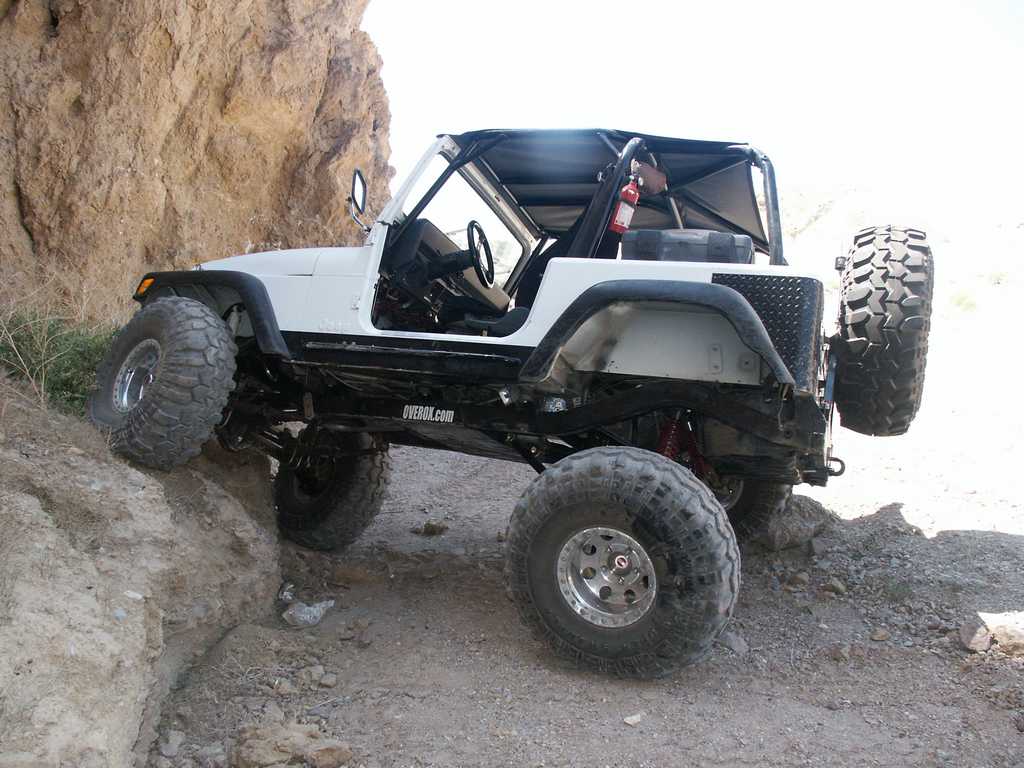
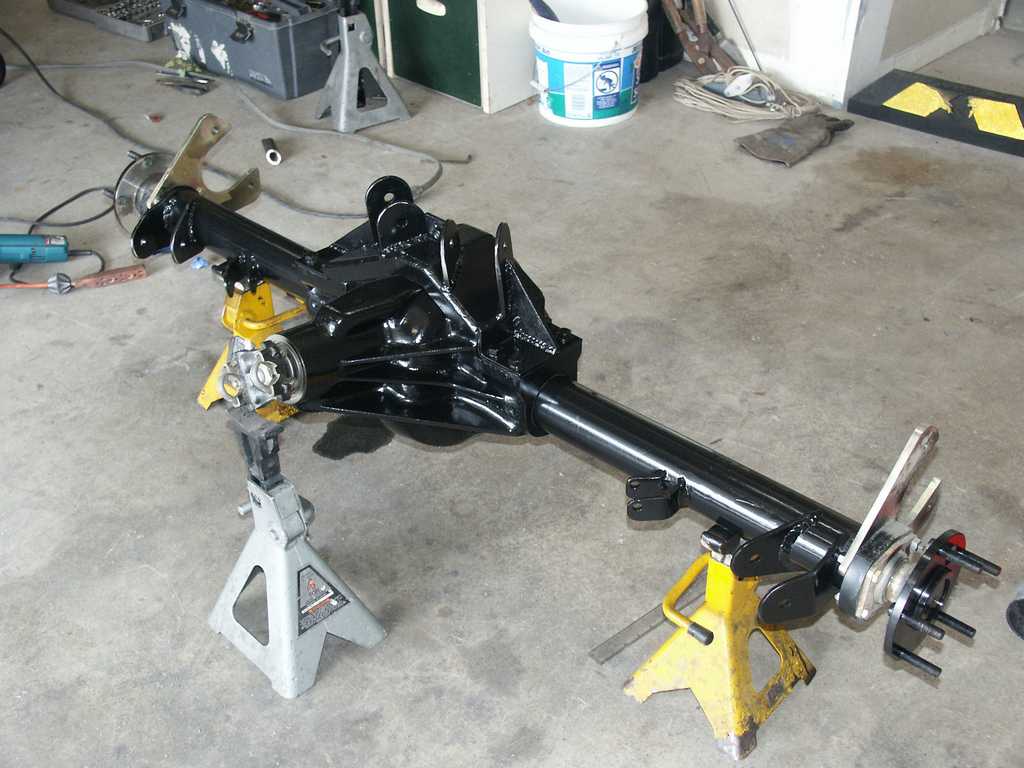
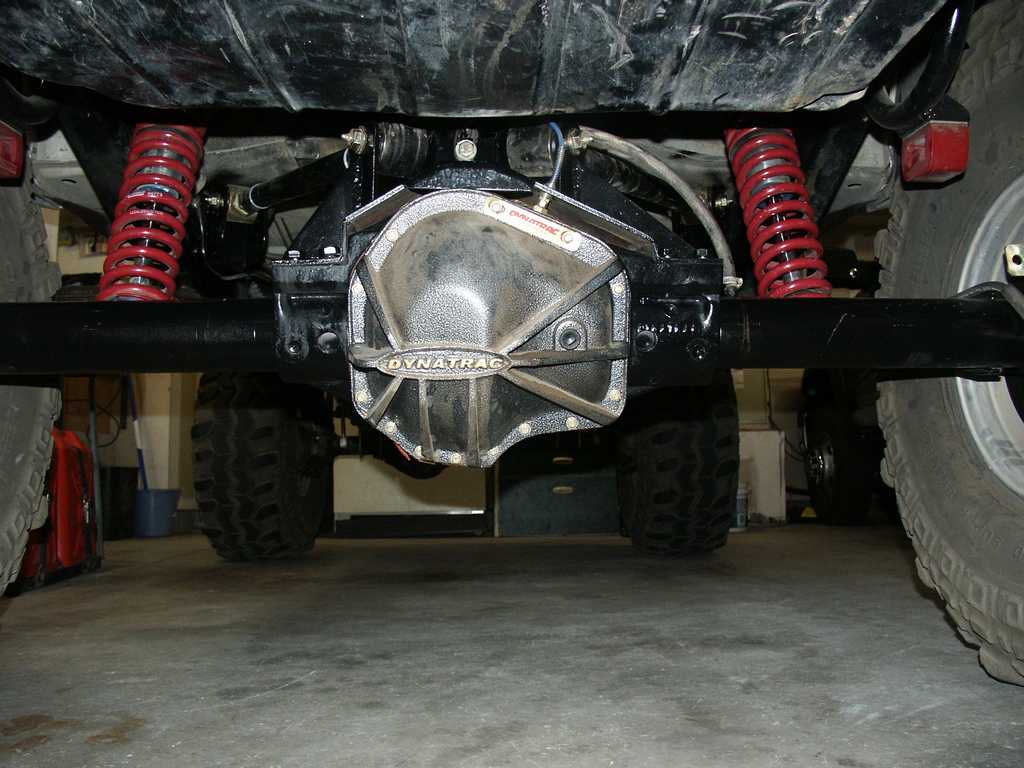
Drove over to Dynatrac today and picked up the axle
Dynatrac ProRock 60
03/31/03 - Ordered the new axle from Dynatrac
I met Seth out at Johnson Valley this past weekend. He had Dynatrac
ProRock 60's front and rear under his TJ. I was going to get myself a high
pinion Ford 9" axle from Currie, but he told me it wouldn't cost much more,
if any, to get the ProRock 60. This morning I called him up and we knocked
out all the details. It worked out to be cheaper and faster to get the
ProRock through Dynatrac, than to get the 9" from Currie. Couldn't
pass that up. I'm getting 35 spline alloy axles, 5 on 5.5" lug
pattern, vented disc brakes, 1350 yoke, dual oil pumps and a high pinion 60
housing with the new cast cover. Seth also said they can machine the
housing to accept a ladder bar, or 3-link system. They flatten 2 spots on
the housing and drill and tap 1/2-13 holes. It wasn't all that expensive
so I said "Go ahead". The axle should be ready to be picked up
around Easter.
04/01/03 - ARB Exchange
In the last CRCA competition, I won a 40% off coupon to any single ARB
product. I had used this coupon only a few days ago to get the ARB locker
for the Ford 9" axle I was going to build. While I was on the phone
with Seth yesterday, the 9" Locker arrived at my house. I
orchestrated with Seth and with Tim at ARB to exchange the 9" locker for
the D60 locker. This morning I mailed the 9" locker back to ARB in
Washington.
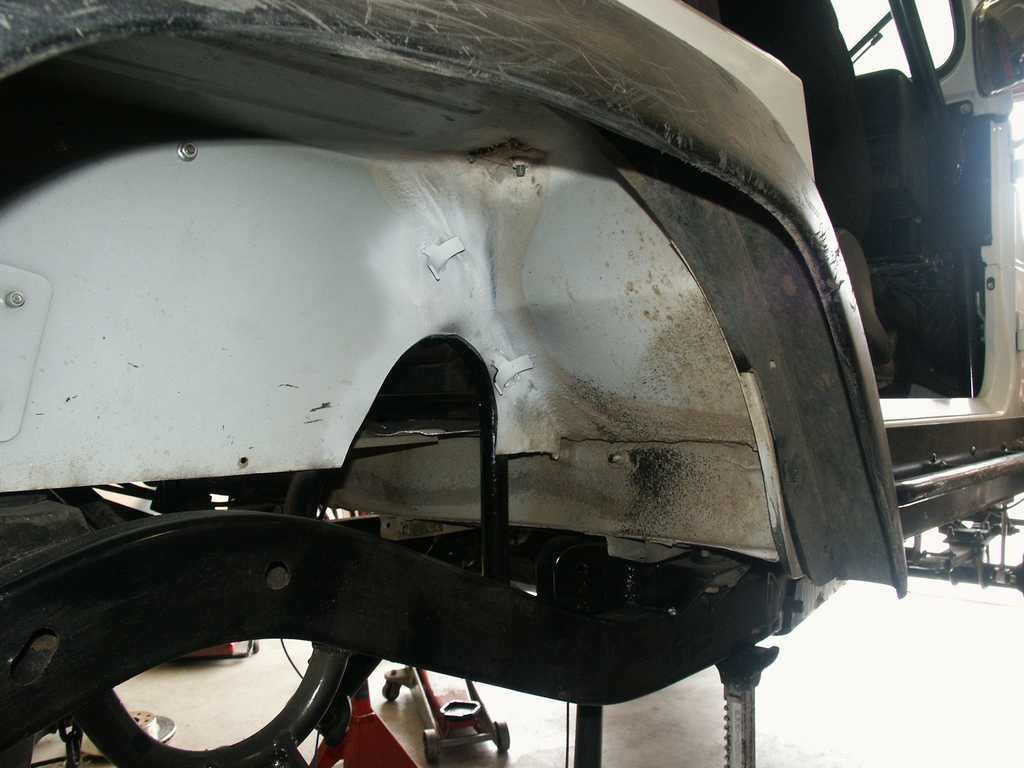
04/09/03 Out with the old
I removed the Dana 44 axle today. I have a potential sale this coming
weekend so I wanted to make sure I was ready
04/14/03 - Didn't sell yet
Never heard from the guy this weekend, but I do have a few other potential
sales. Hopefully I can get this sold before I have to pay the balance on
the ProRock60. Interested? Check my For
Sale page.
04/16/03 - Sold the Dana 44
A guy named Nate emailed me yesterday, interested in my Dana 44 axle for
sale. Have came over today and bought it. :)
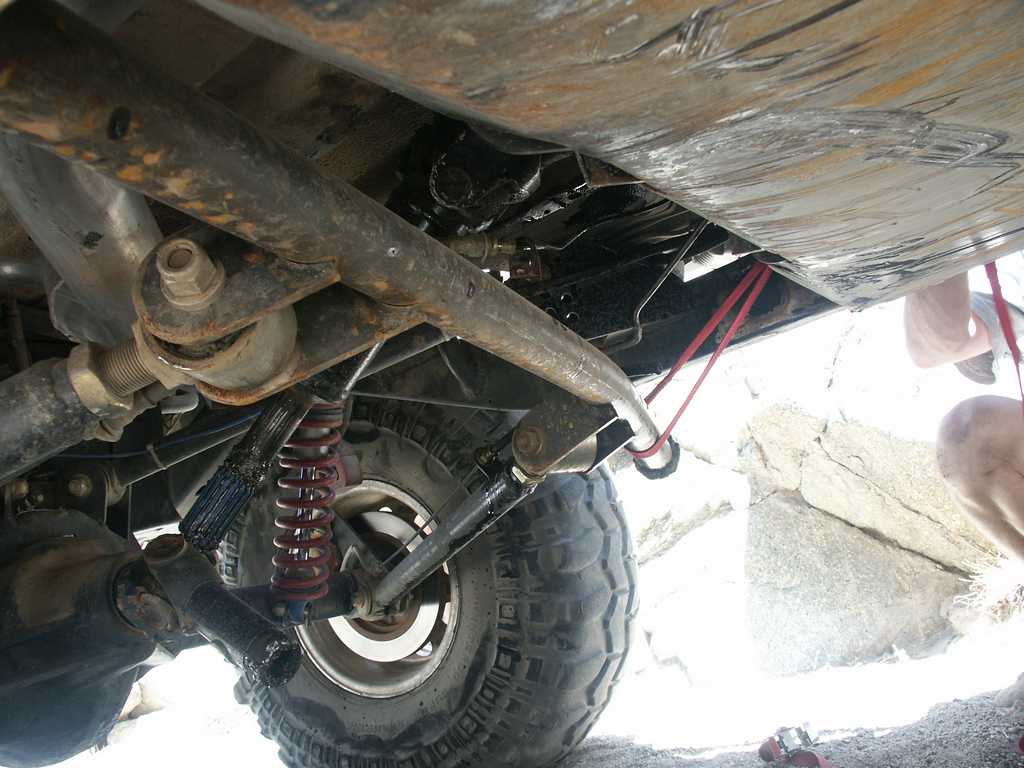
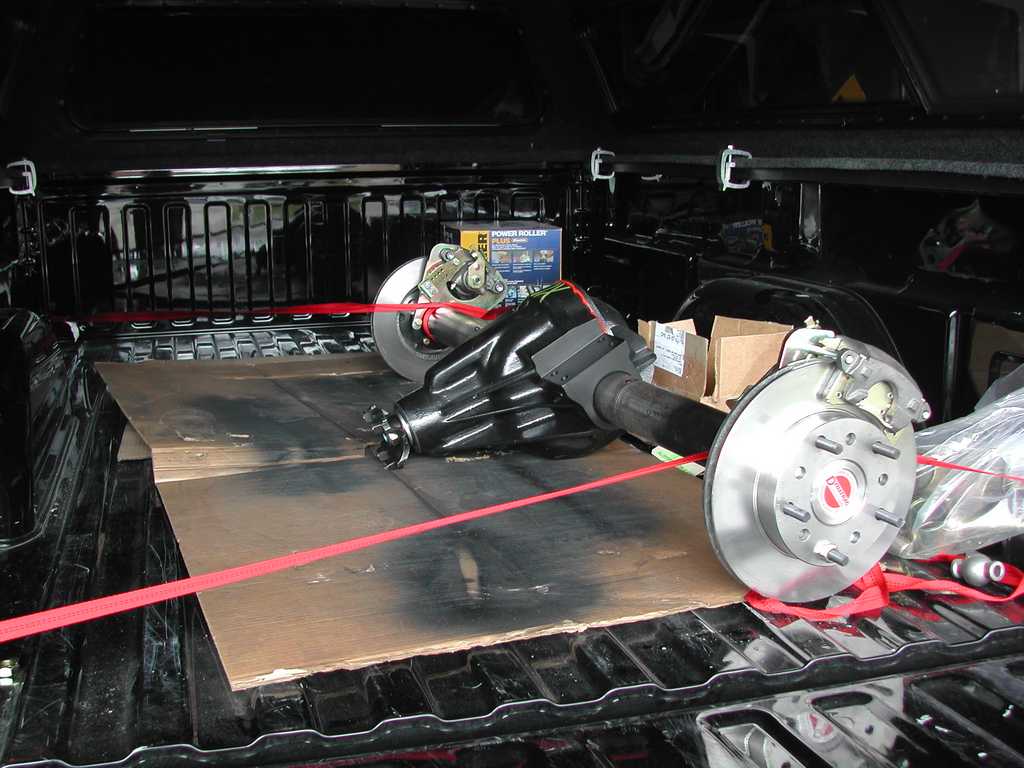
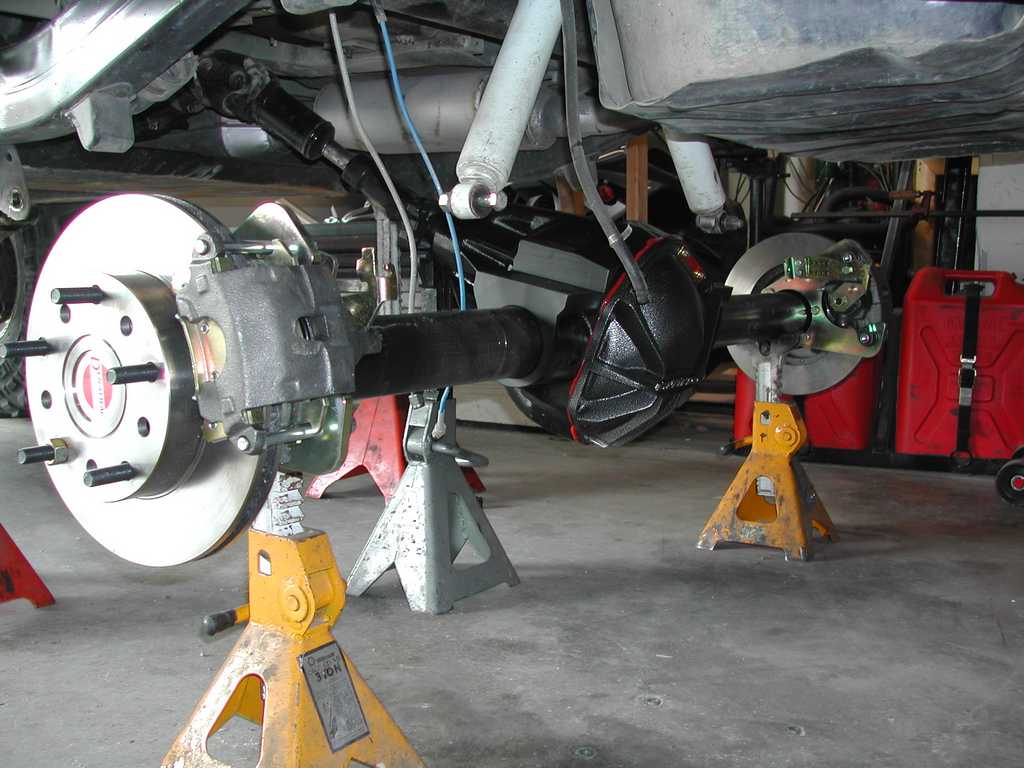
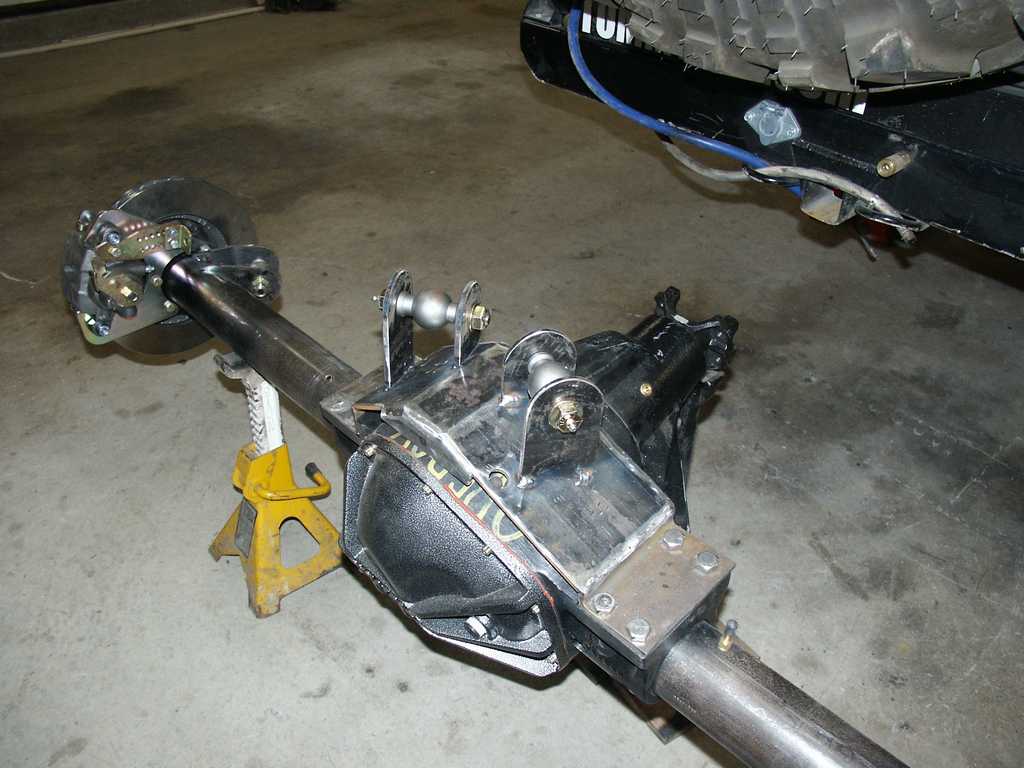
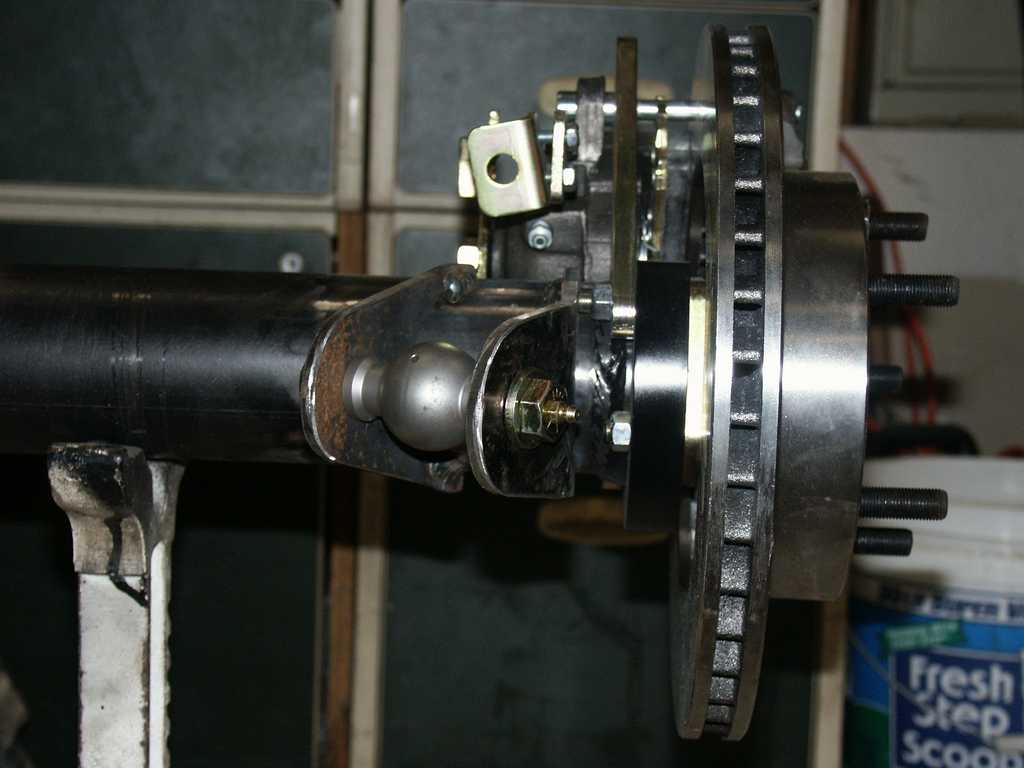
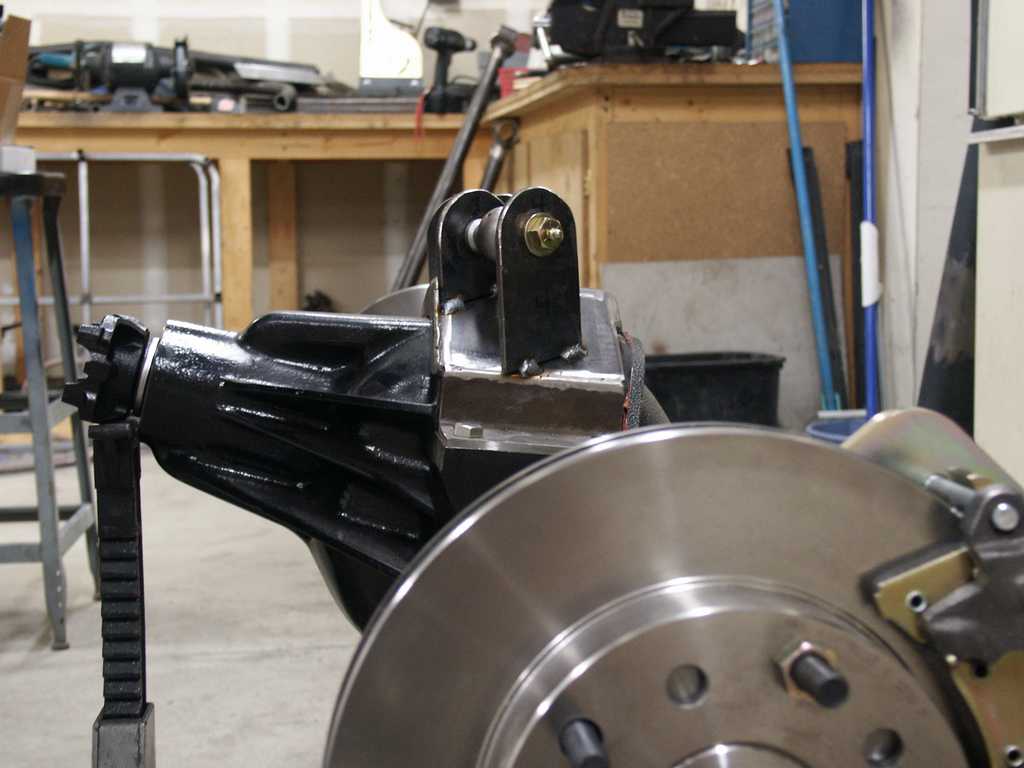
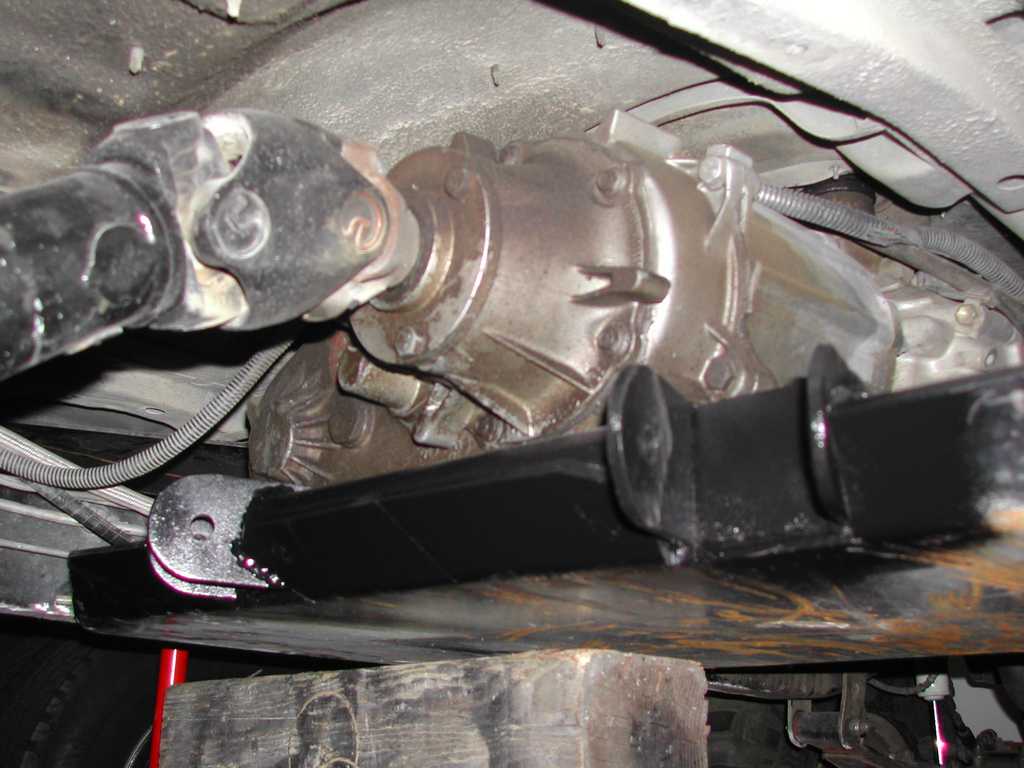
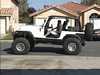
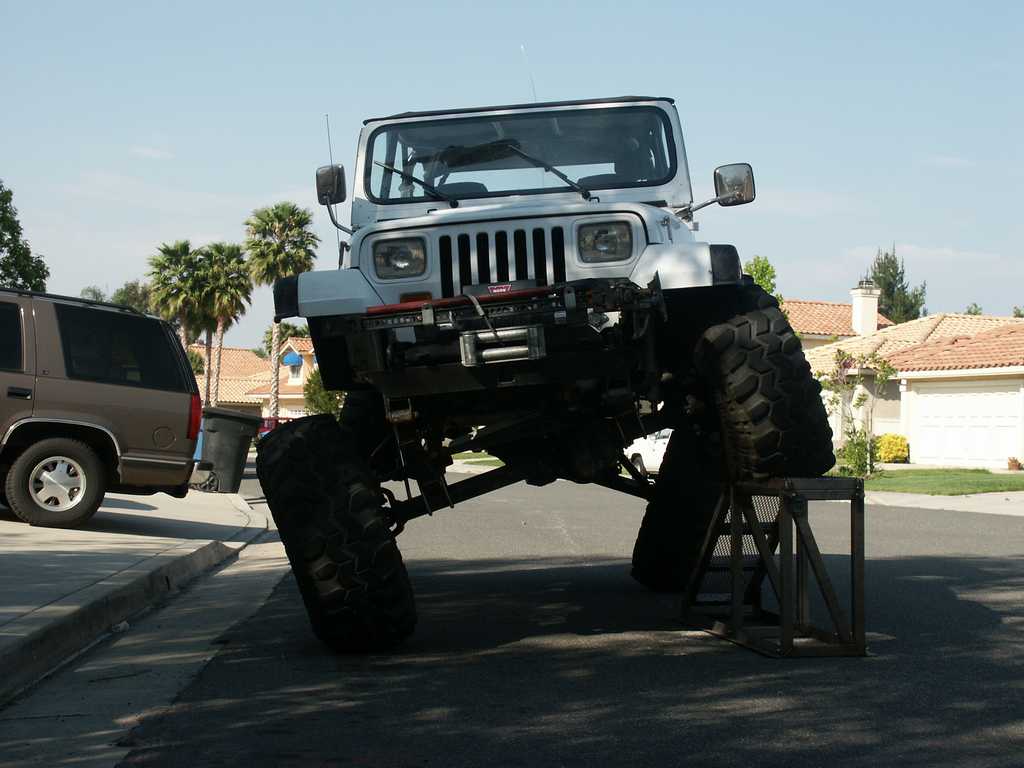
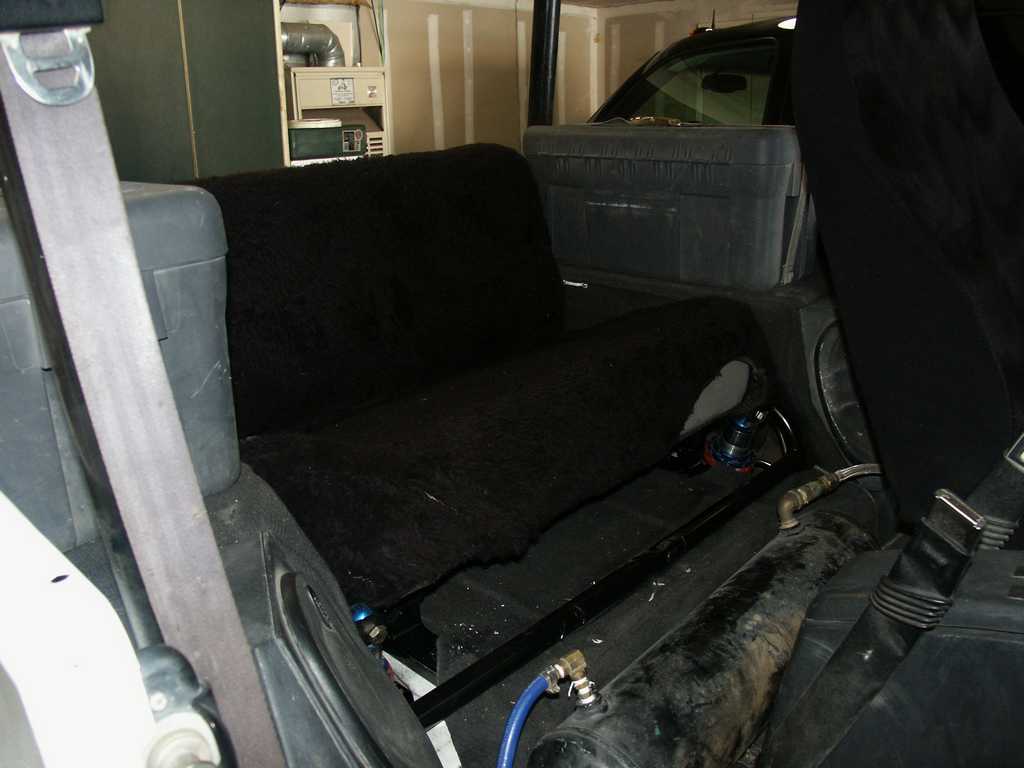
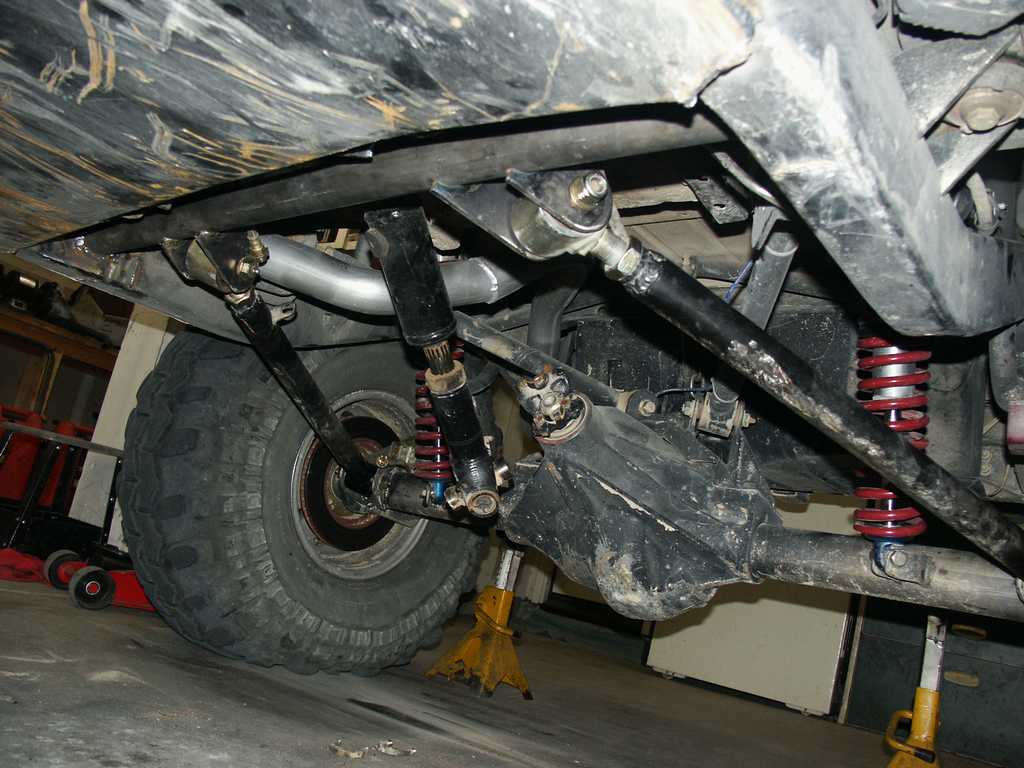
04/21/03 - Picked up the axle
Drove over to Dynatrac today and picked up the axle
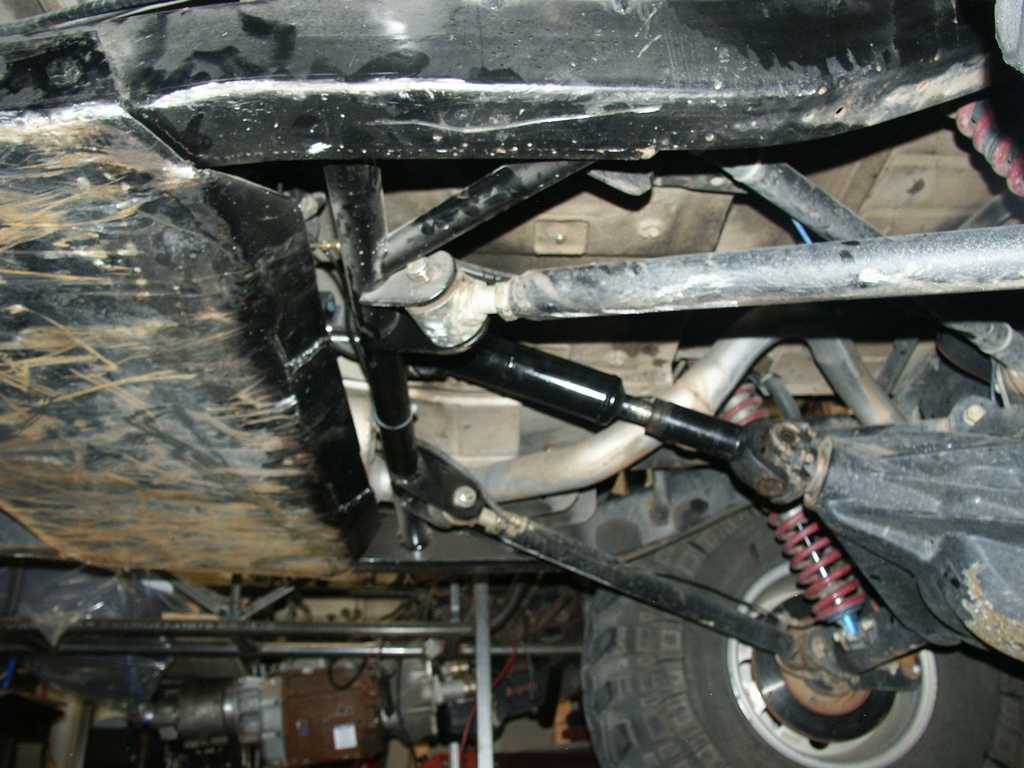
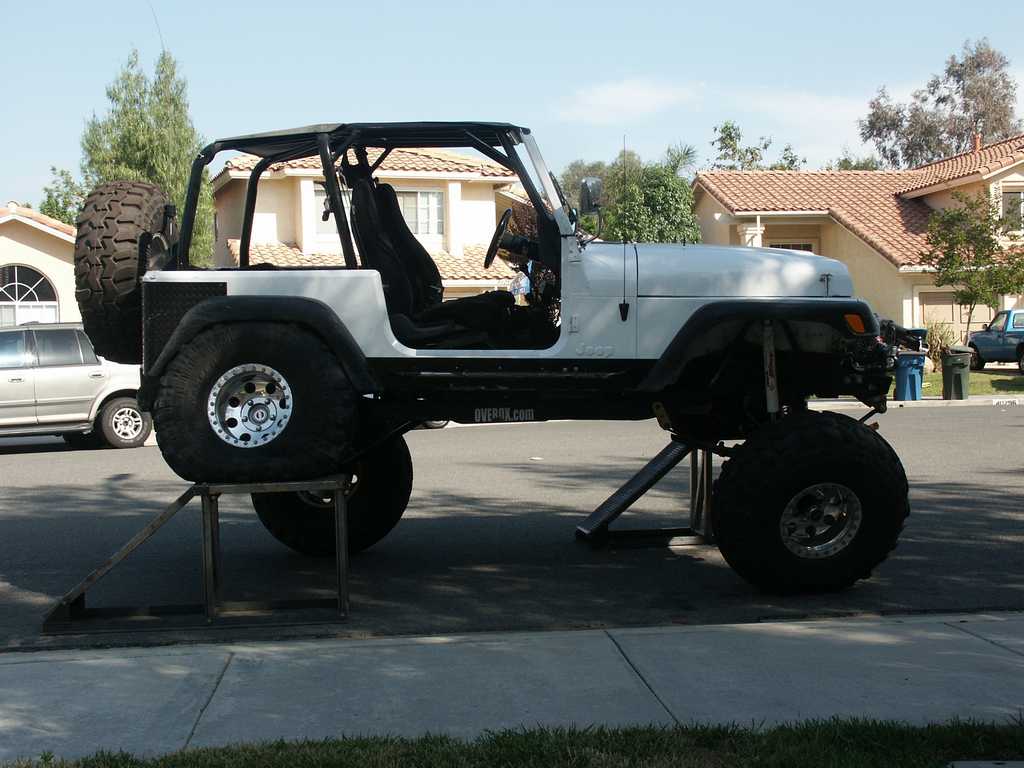
04/22/03 - Put the axle under the jeep
I didn't get time to get the axle out of the truck yesterday so I did that
today. All I was able to do beyond that was place it under the Jeep
because I had a computer hard drive failure. That kept me busy for a while :(

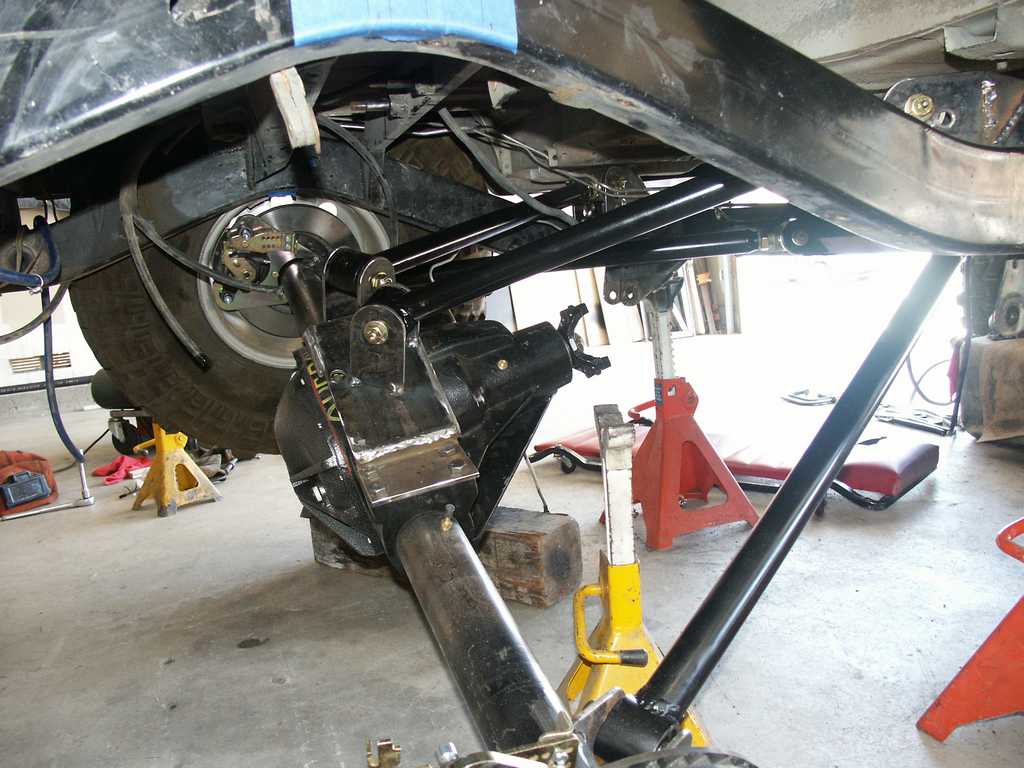
04/24/03 - Design
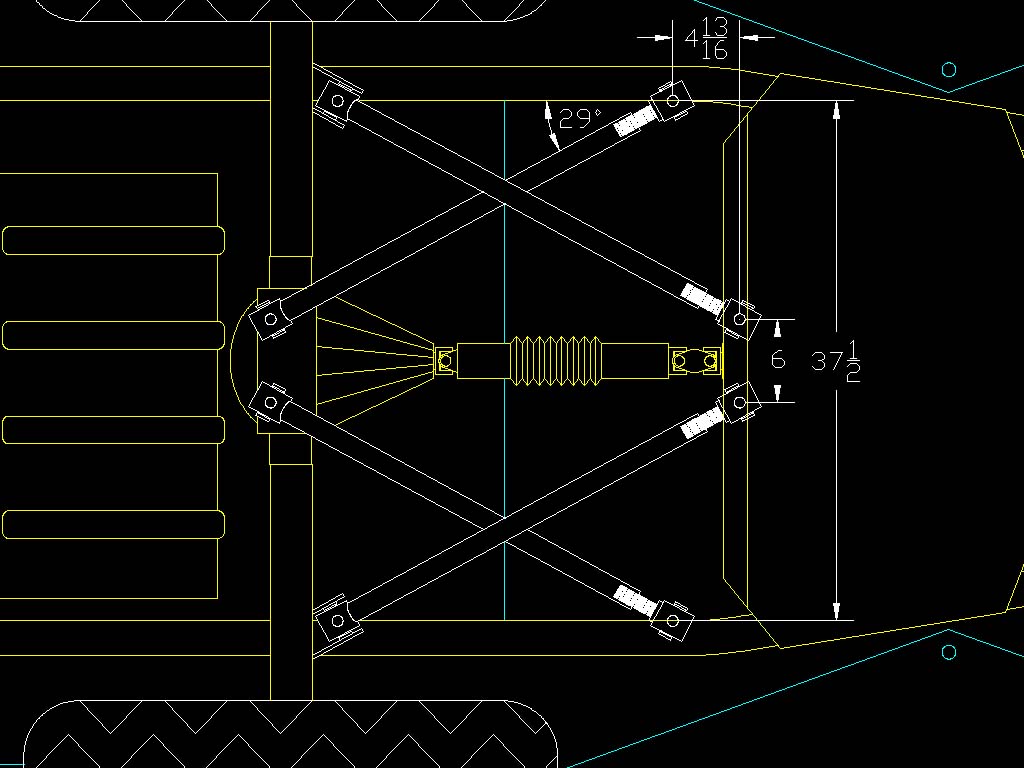
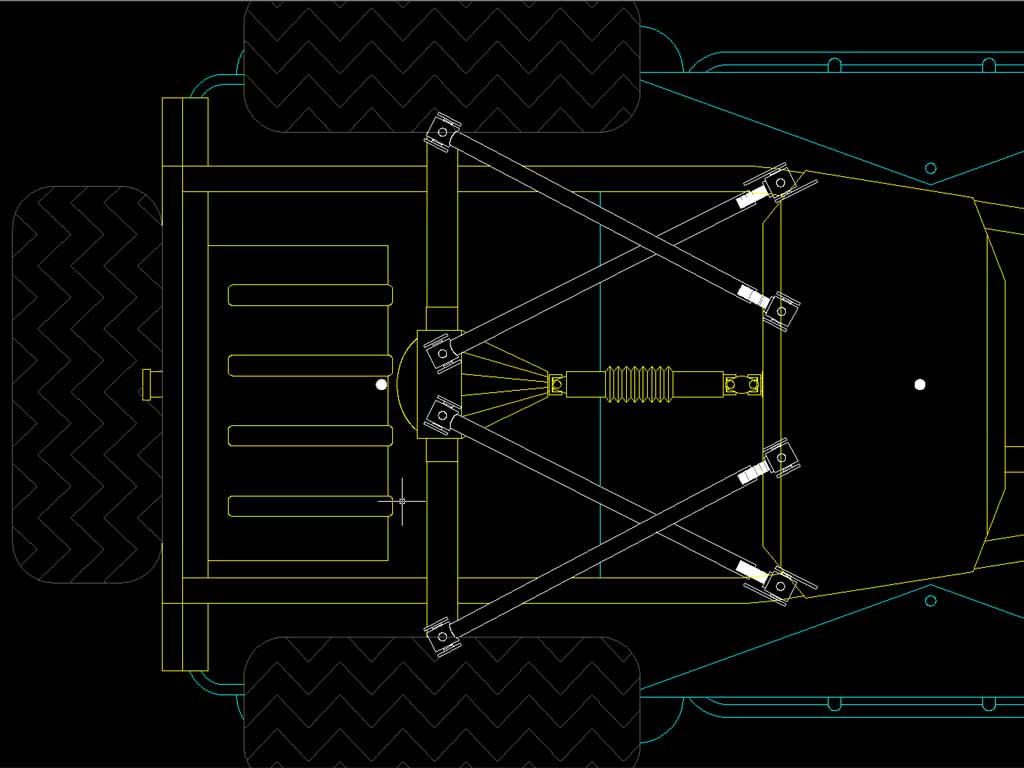
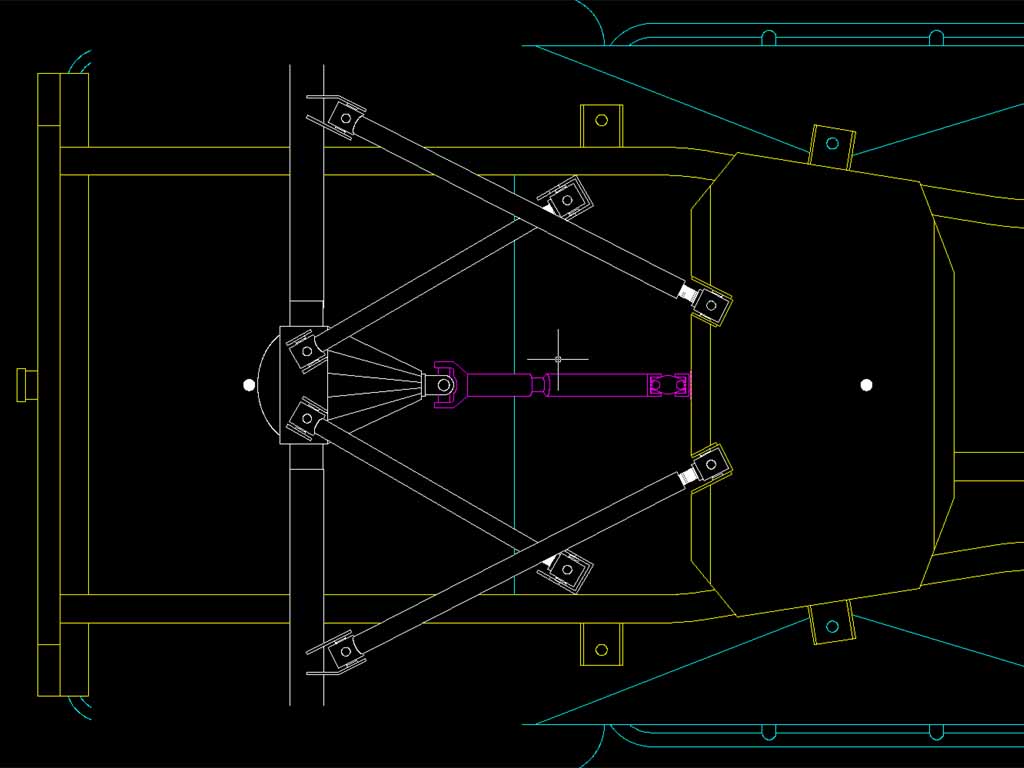
Here's what I have so far as far as designs for the links. I'm going to
worry about where the coils go at a later date. I'm debating between under
the frame, or inside the frame. My first preference is under the frame
because the wider they are apart, the better performance I'll get from
them. But I'm not sure I have enough room under the frame. There's a
lot more room just inside the frame, which is where they will probably end up
going. Anyways, here's a couple ACAD drawings of where I plan to put the
links. BTW, the links in the first picture look like they're placed under
the axle, but they're actually on top of the axle. I just left them drawn
like that to help in fabrication.
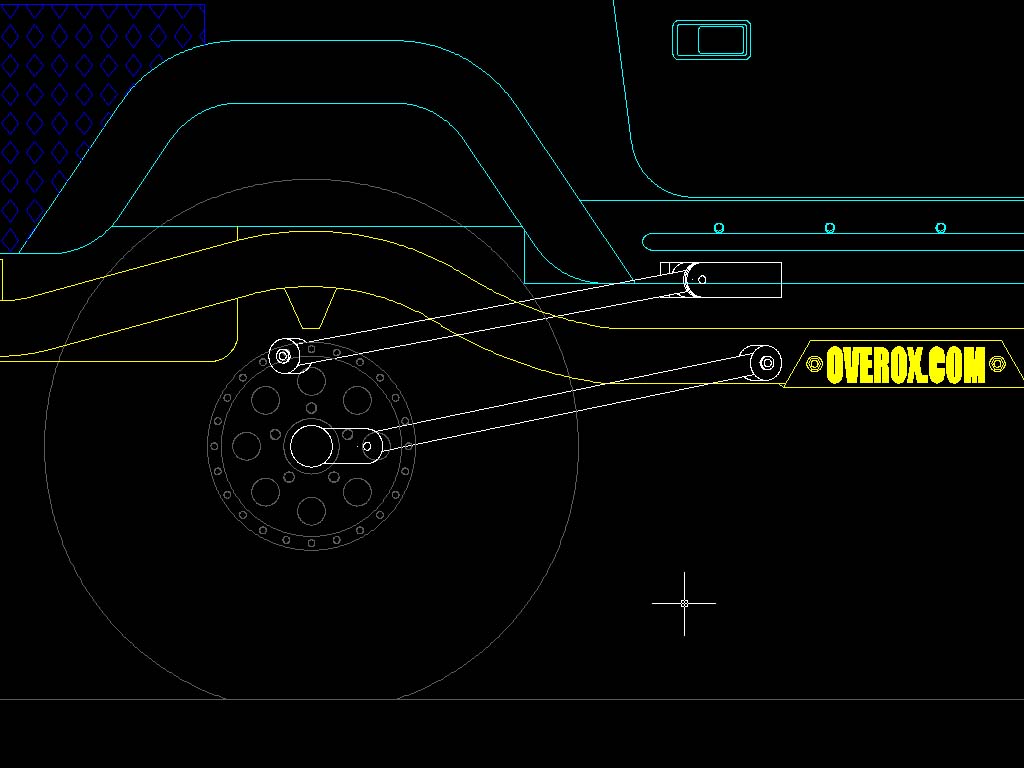
04/26/03 - More design work
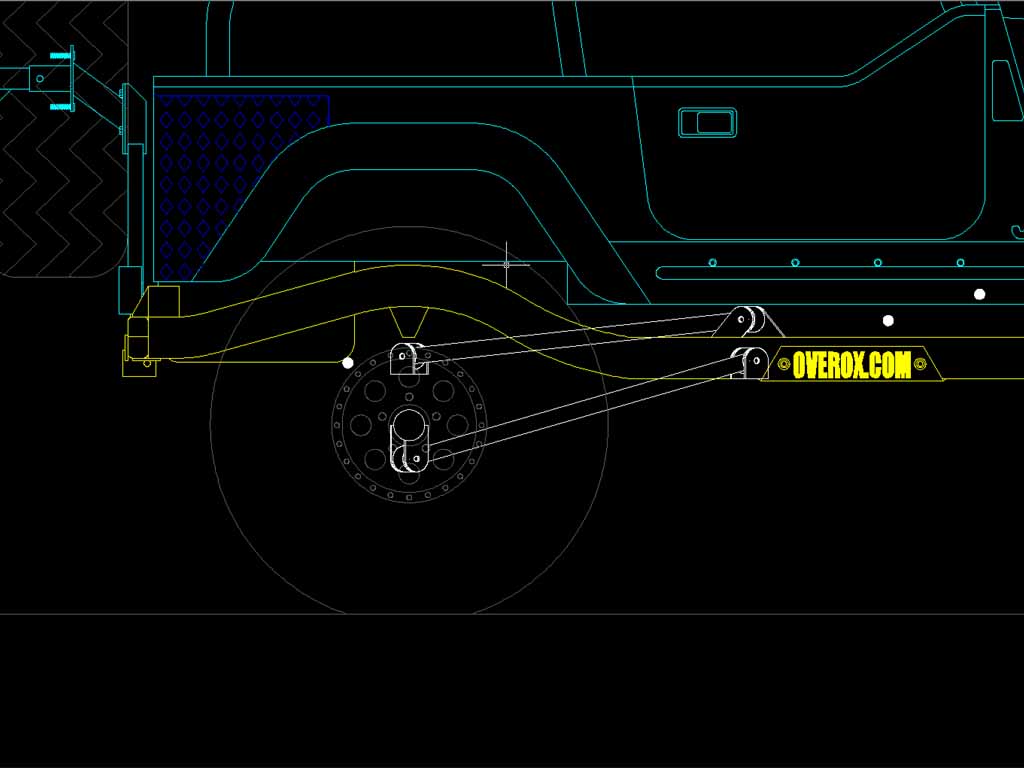
After spending a few hours talking to EJ about the location of my links, we
decided on a few changes. I moved the frame mounted uppers, down and back
a bit. I also moved the axle side lower mount down below the axle housing,
and more to the outside. This is a much stronger location than the
original plan. All this should mean less rear-steer, less anti-squat and
MUCH stronger links. Here's a couple more shots showing the new locations.
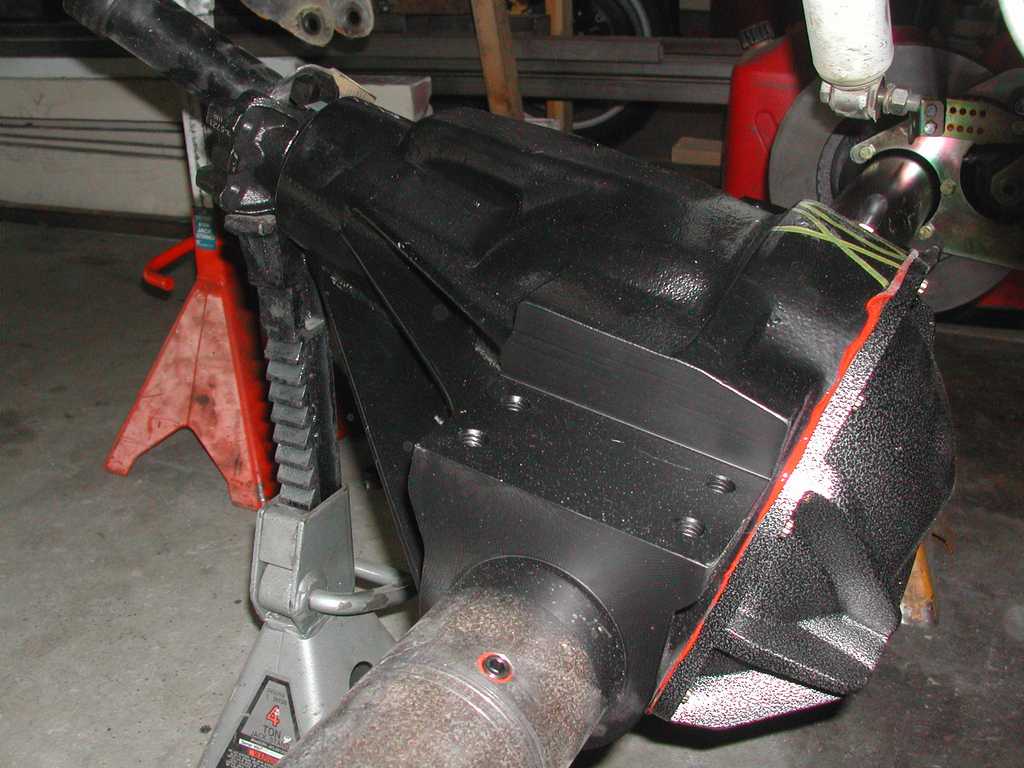
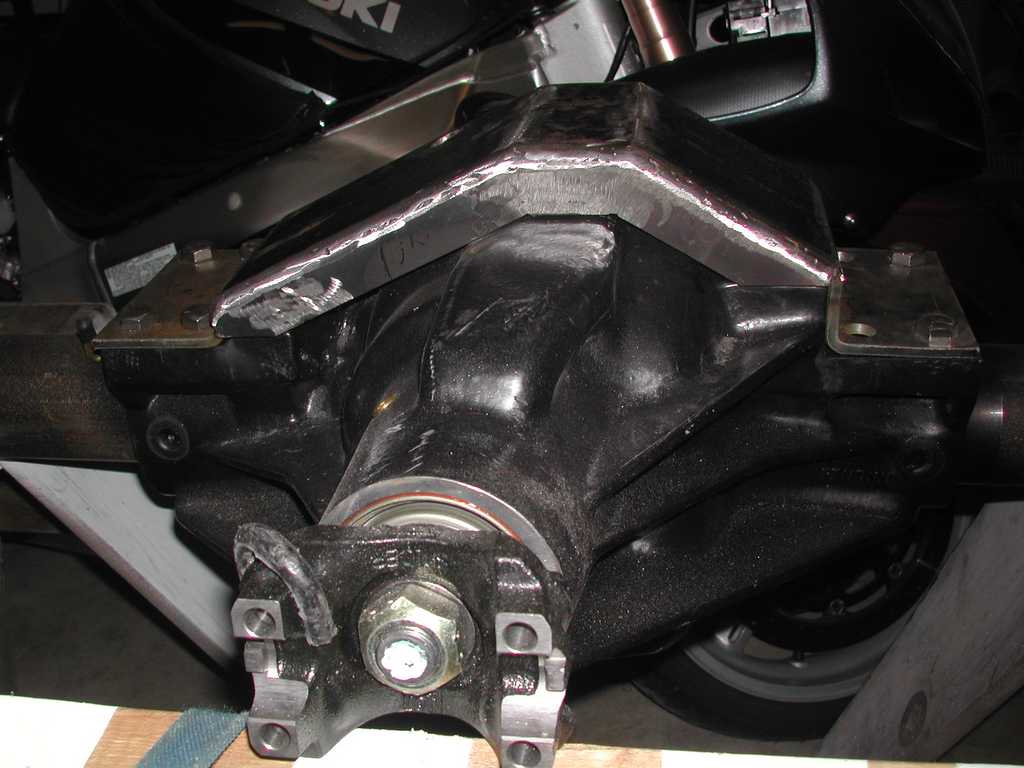
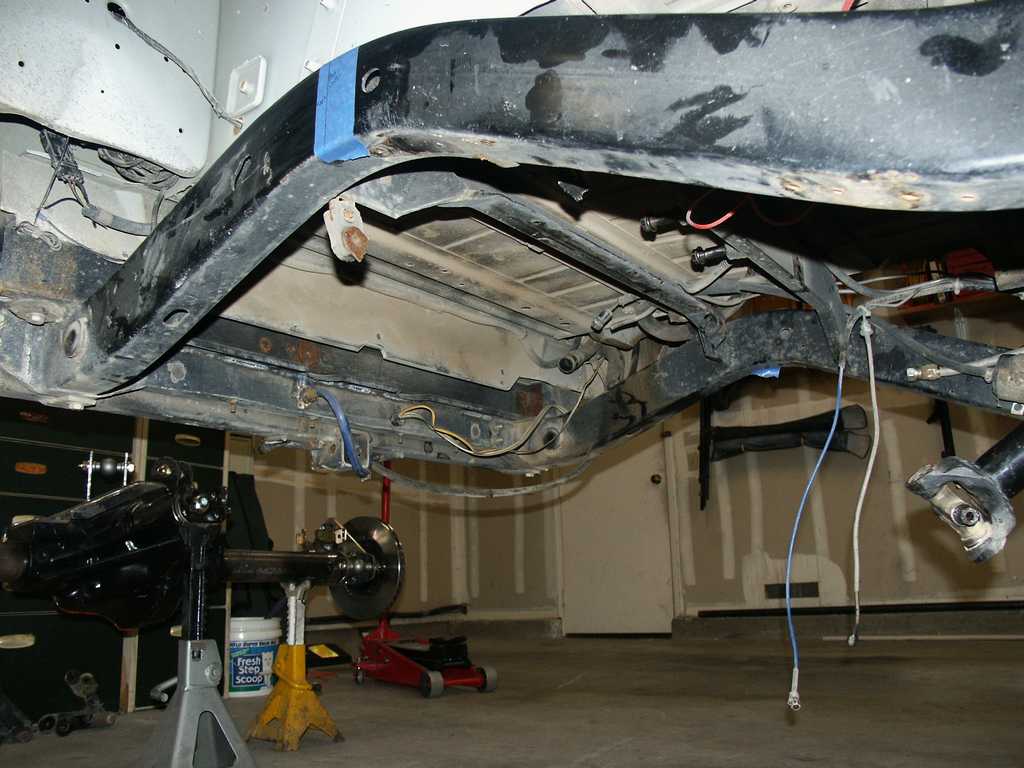
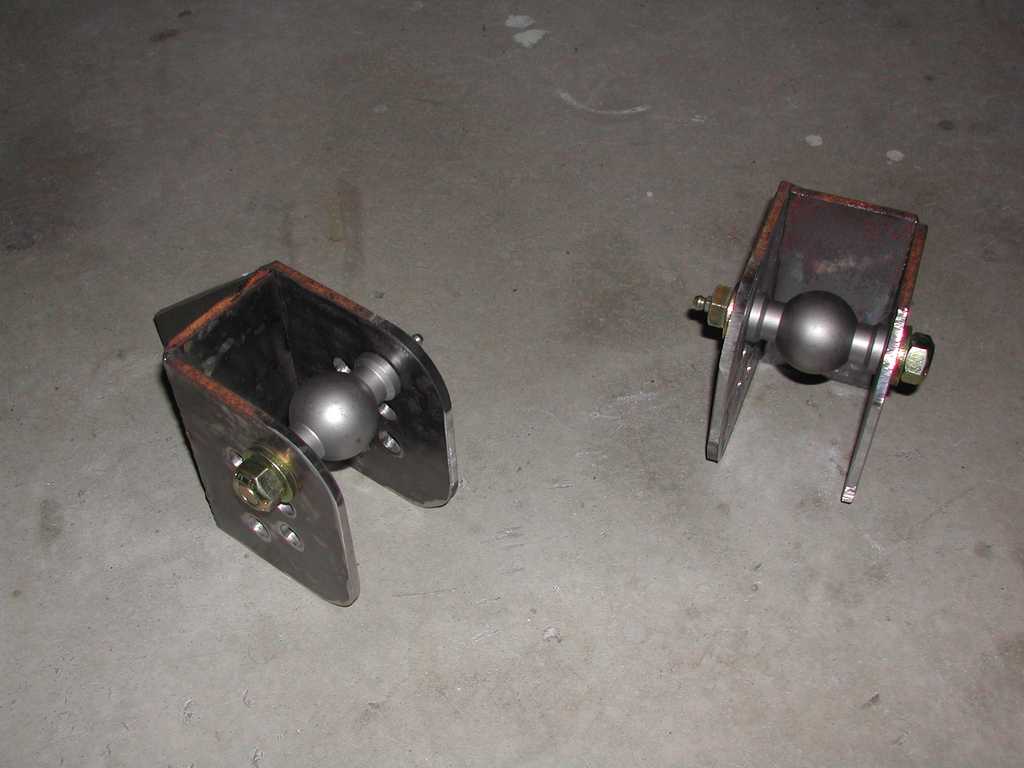
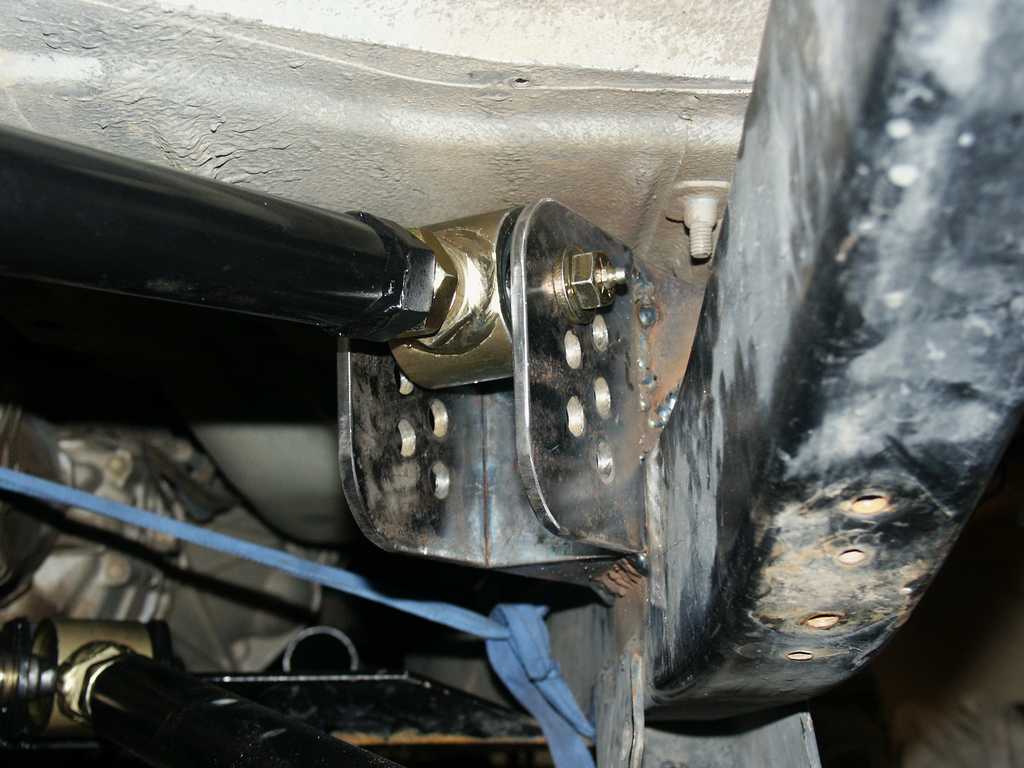
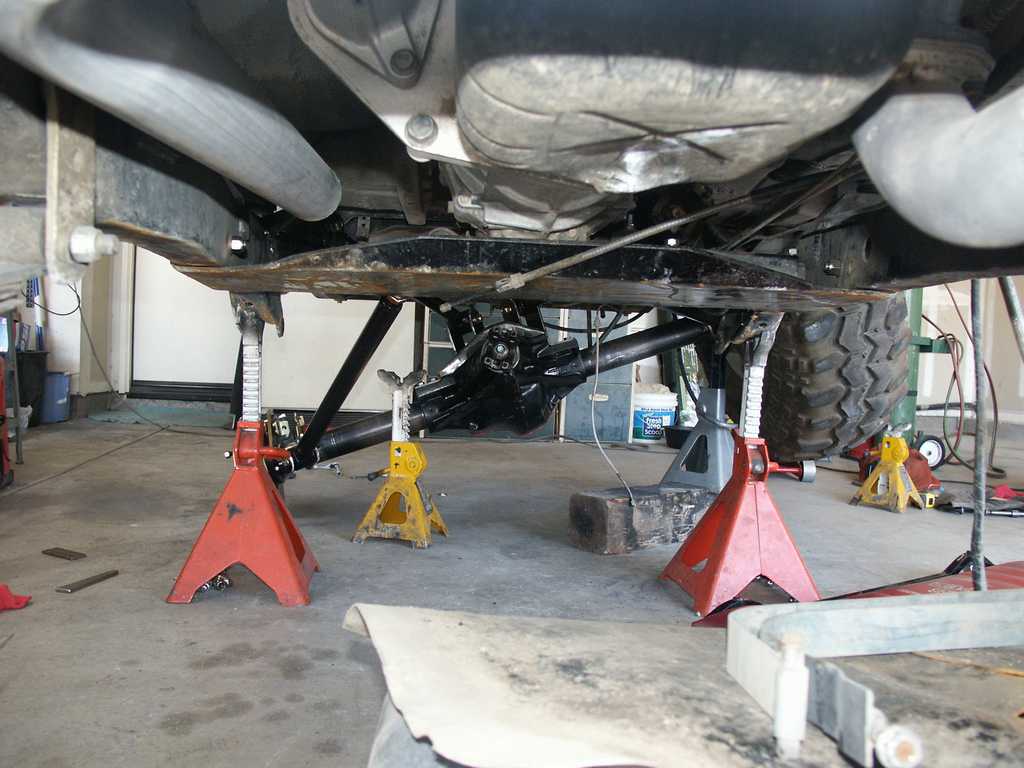
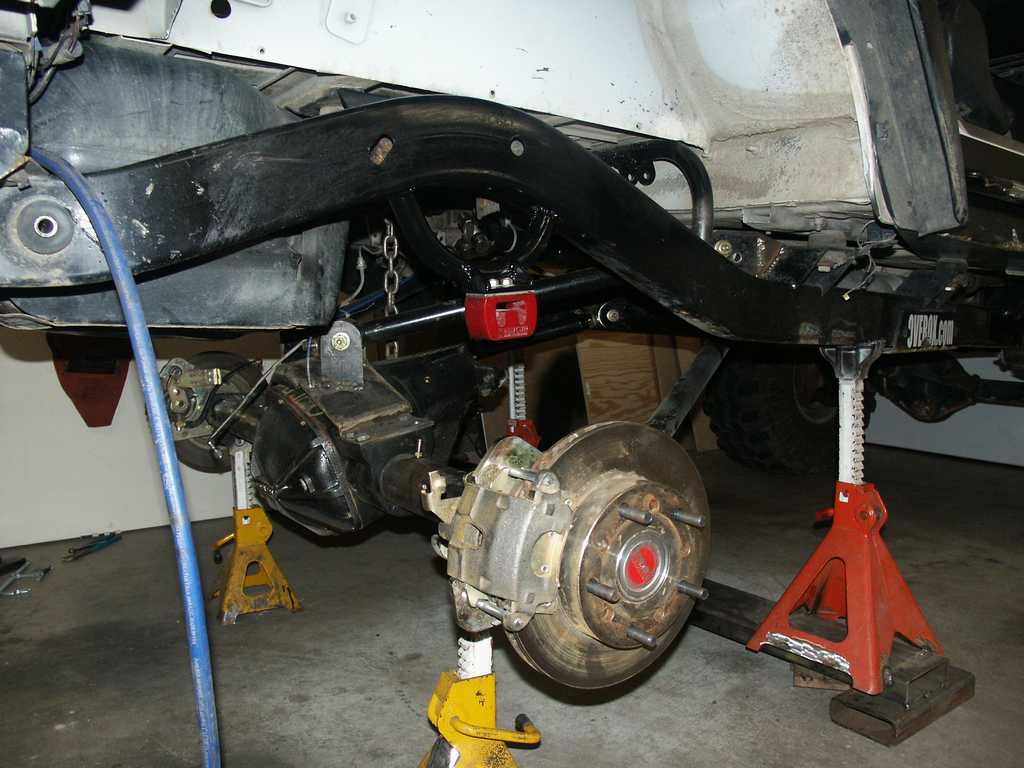
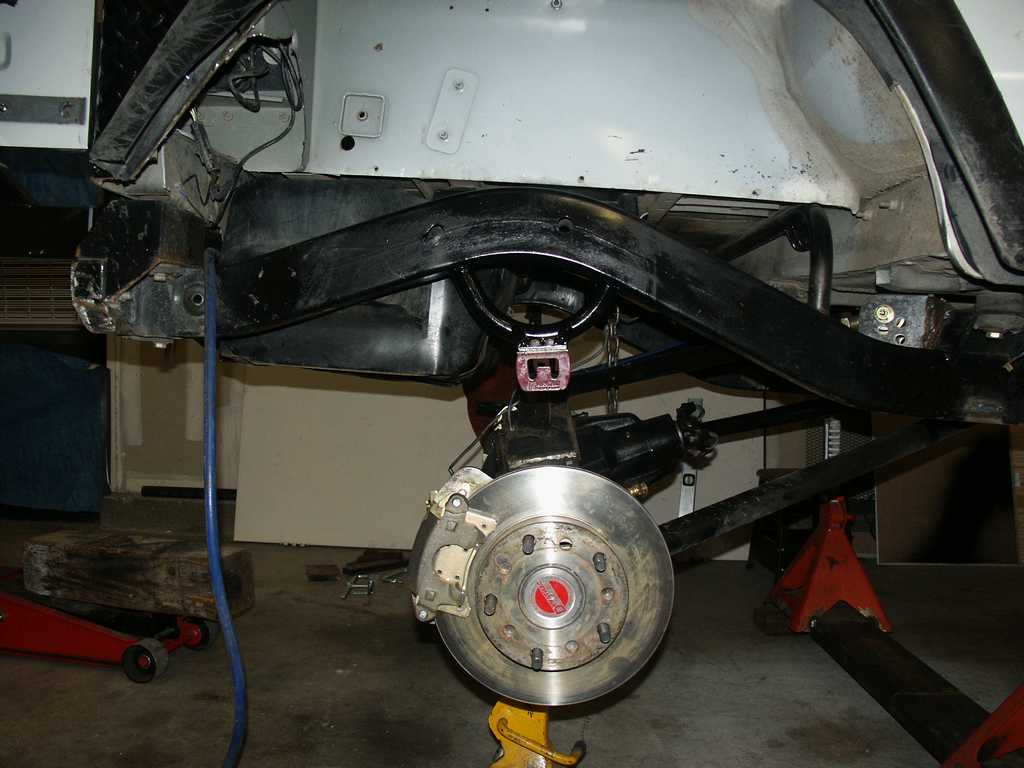
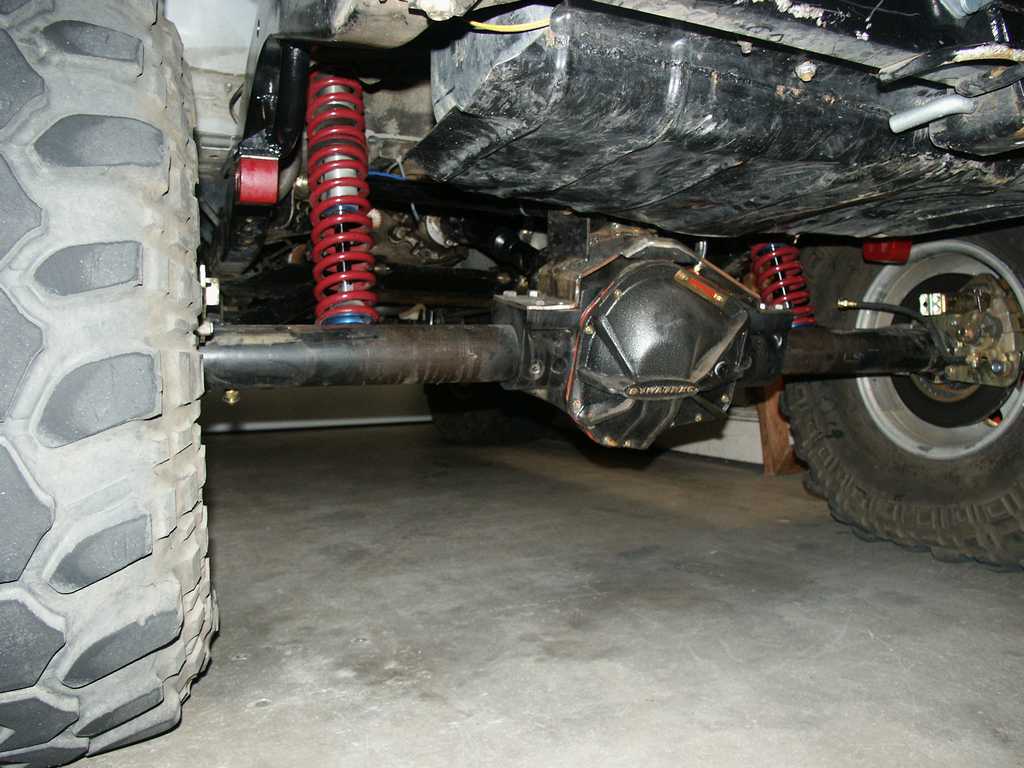
04/27/03 - Made the bridge
To attach the upper links to the top of the axle housing, I needed to make a
bridge to connect the machined left side to the machined right side. This
way I can weld on whatever mounts I need to attach the link ends without having
to weld to the housing.


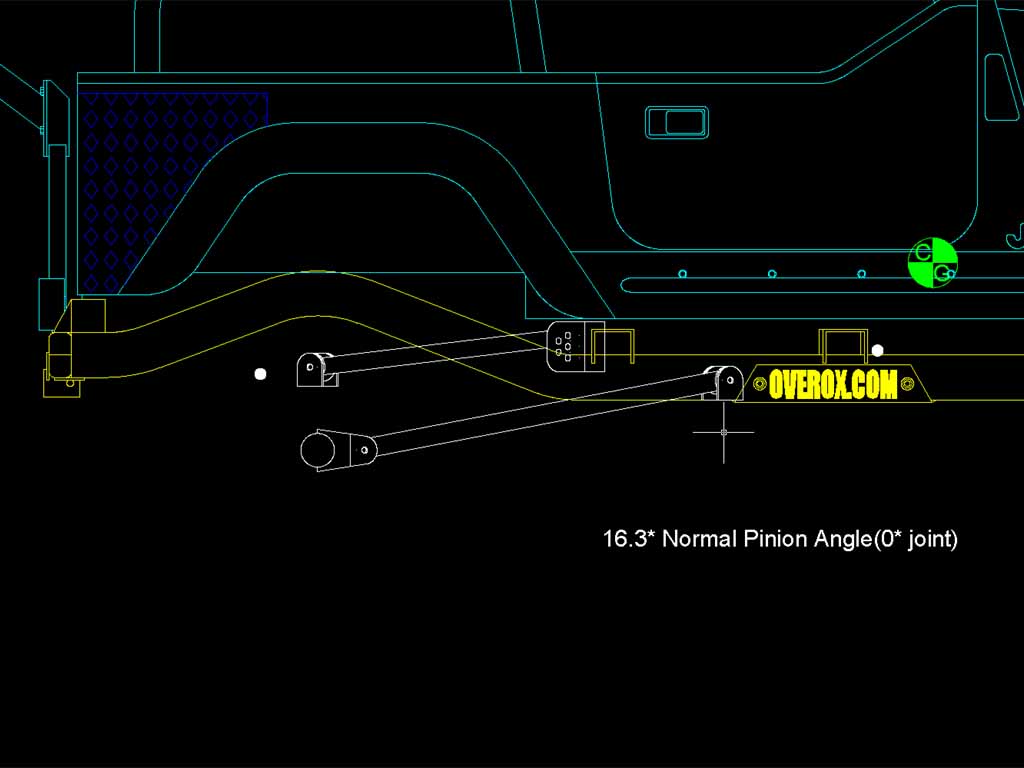
05/04/03 - More design work
Over the past few days I've done a lot of research regarding Anti-Squat (for
here on out referred to A.S.), Roll-Axis, Instant Center, Force Vector, Force
Vector Intersection, etc. With a higher education comes changes.
I've moved my links back and forth, back and forth. I think I have my
final design now. I can't get anyone to tell me what a decent A.S.
percentage is because there's way too many factors. The closest estimate
to a proper setup is "somewhere between 50% and 150%". Because
of that I've decided to incorporate adjustability in my upper frame mounted link
ends. With the current design, I can have 99%, 101%, 125%, 137% or 152%
A.S. I should be happy with at least one of those values. Using any
of them gives me a Roll-Axis in the 2* range which is acceptable. (the higher
the Roll-Axis degree, the more rear-steer). Anyways, here's a couple more
design shots:
05/09/03 - Physical progress
It's been a few days since I updated here. Since the last update, I
ordered my 1.50"x.25" DOM tubing and received it. I also learned
I was a complete bonehead thinking that I could thread a 1"x14 bolt into a
1" ID pipe. DOH. Oh well, I'll have to figure out another way
to attach the adjustable Johnny Joints. I'll probably weld on a nut, then
sleeve over that for extra strength. Anyways, back to the update...
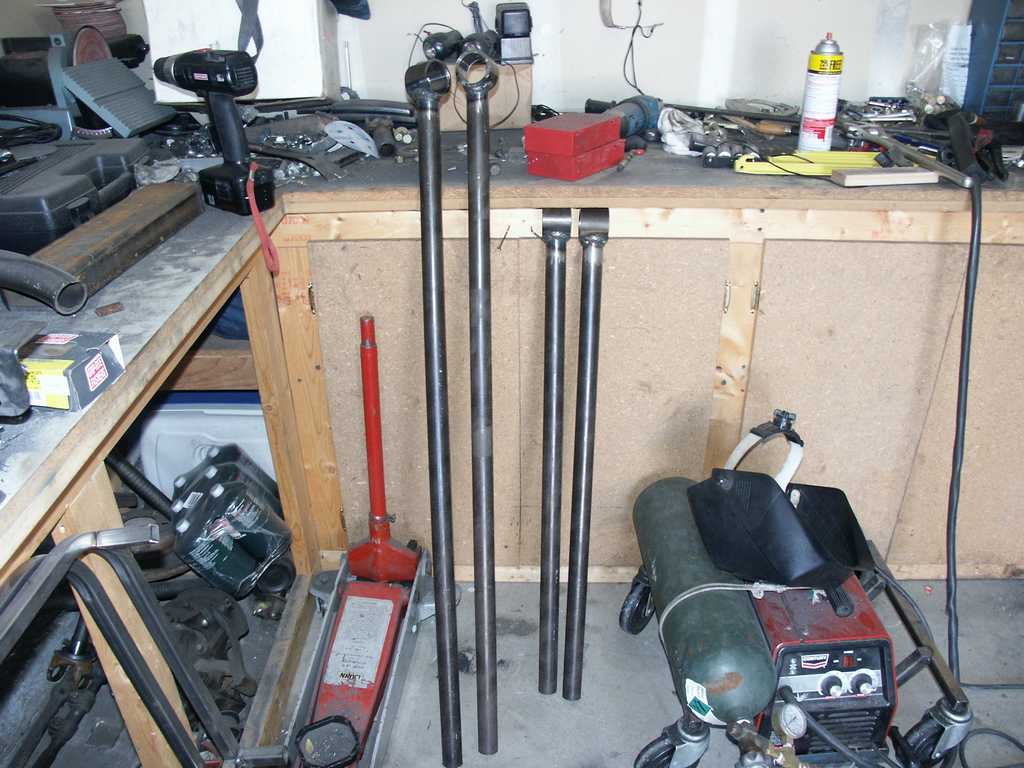
I made all the brackets for links on the axle. They were pretty weird to
make and I'm glad I'm done. A lot of math I didn't feel like doing.
The top mounts were the toughest to figure out. They mount on different
sloping angles (25* and 31*), but then pitch the entire assembly back 8*, and
mount diagonally on that weird slope. Anyways, I managed to figure it out
and made four individually different parts to make it all work. And guess
what?...? It did! I tack welded all the mounts to the axle. Oh
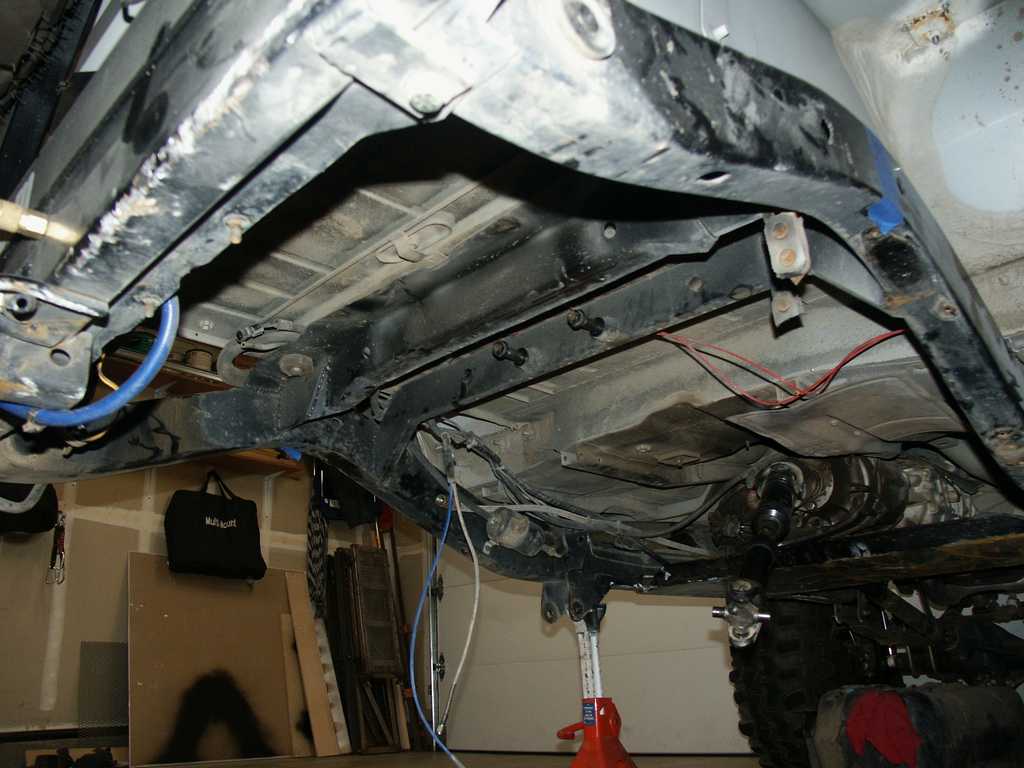
yeah, I also gutted the underside of the Jeep. I've resigned myself to the
fact that I can't run a stock fuel tank anymore. Going to have to figure
something out there. On to the pics!


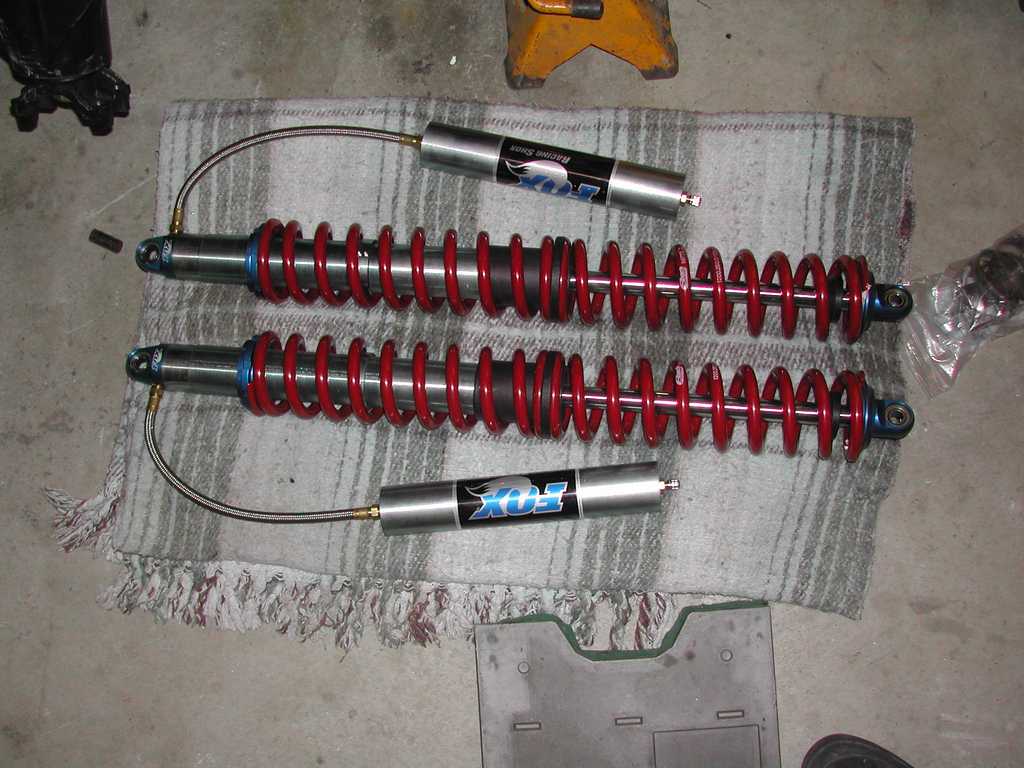
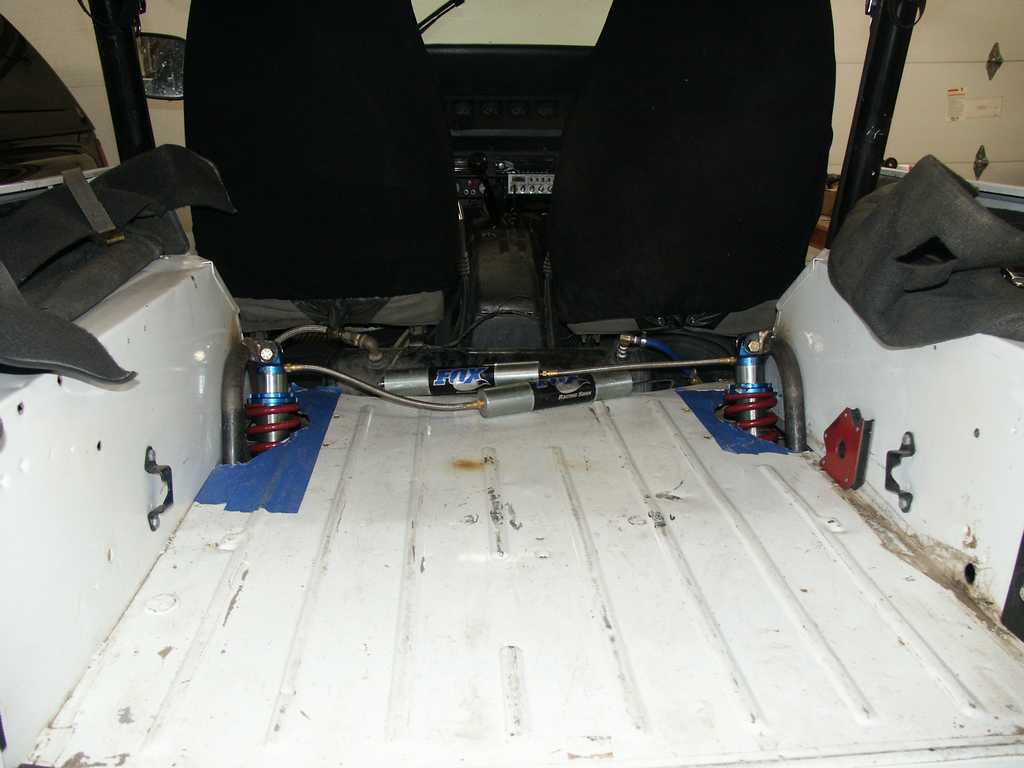
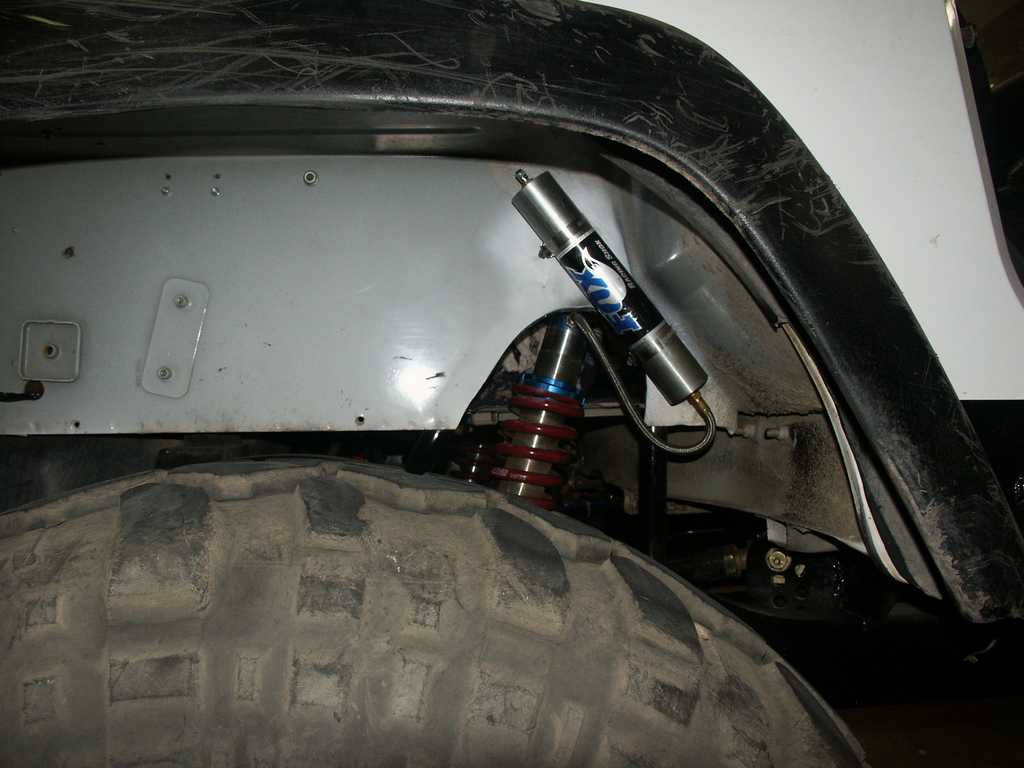
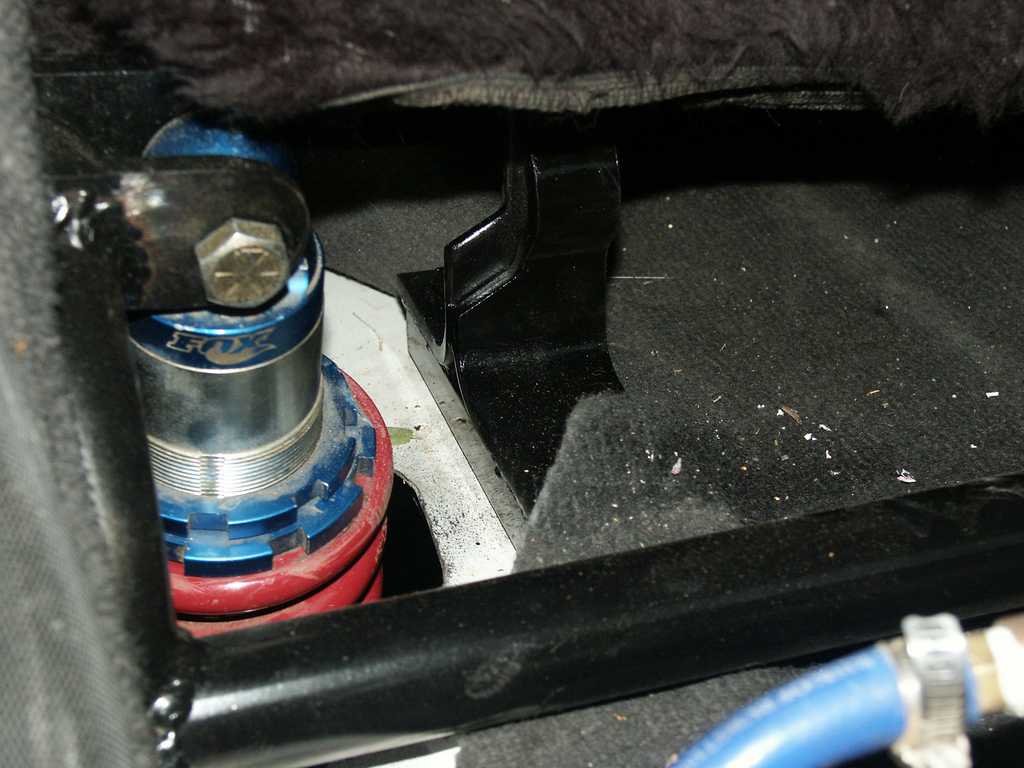
05/12/03 - Ordered coil-overs
I ordered my coil-overs today. I was originally looking to go the
inexpensive route with this project with separate coils, but it's just not
working out that way now. I went with 12" stoke Fox coil-overs with
remote res. Because of the 40* lean, I'm starting out with twin 400lb
springs on each coil-over. That gives me an overall rate of 200lbs.
Just an FYI, to figure spring rate with two springs per coil, here's the math
(S1 x S2) / (S1 + S2). So (400 X 400) / (400 + 400) = 200lbs. I'm
pretty sure that's the spring rate I want, but we'll see. Dave at Poly
Performance told me he'd work with me on exchanging springs if I didn't
damage the springs at all. That's pretty sweet. If it's too stiff, I
can exchange one from each side for 350's and that'll give me an overall rate of
186lbs.
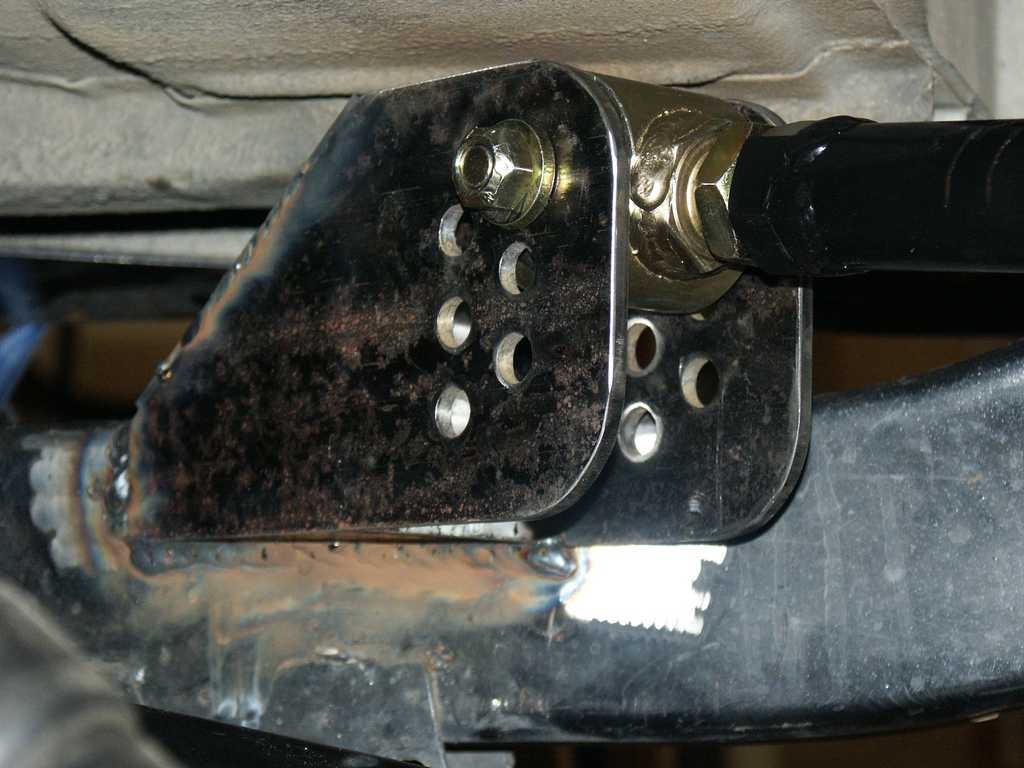
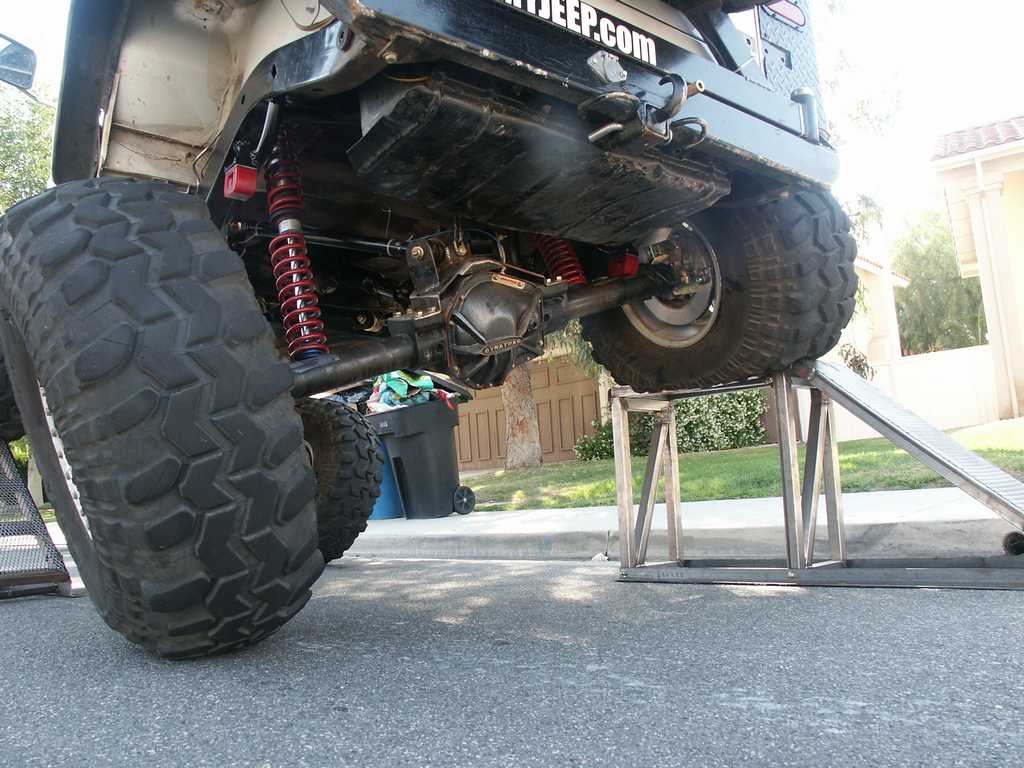
05/14/03 - Lots of work done!
Today I built the upper frame side link mounts and I modified the skid plate to
be the lower frame side link mounts. UPS also delivered my Fox coil-overs
:)
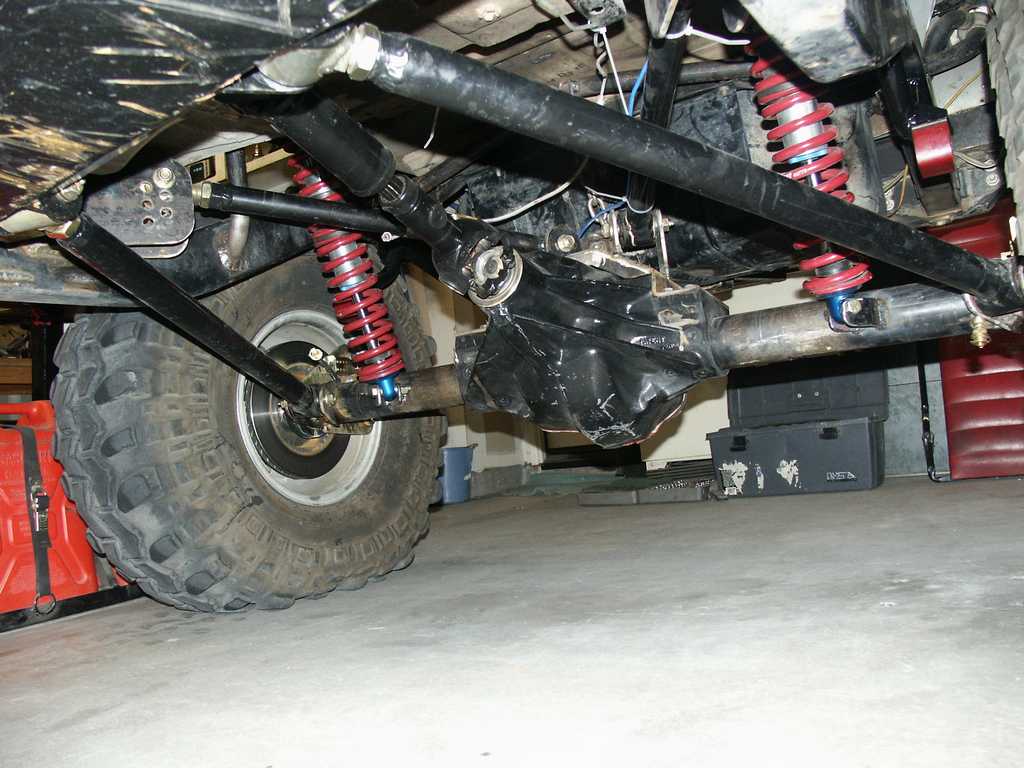
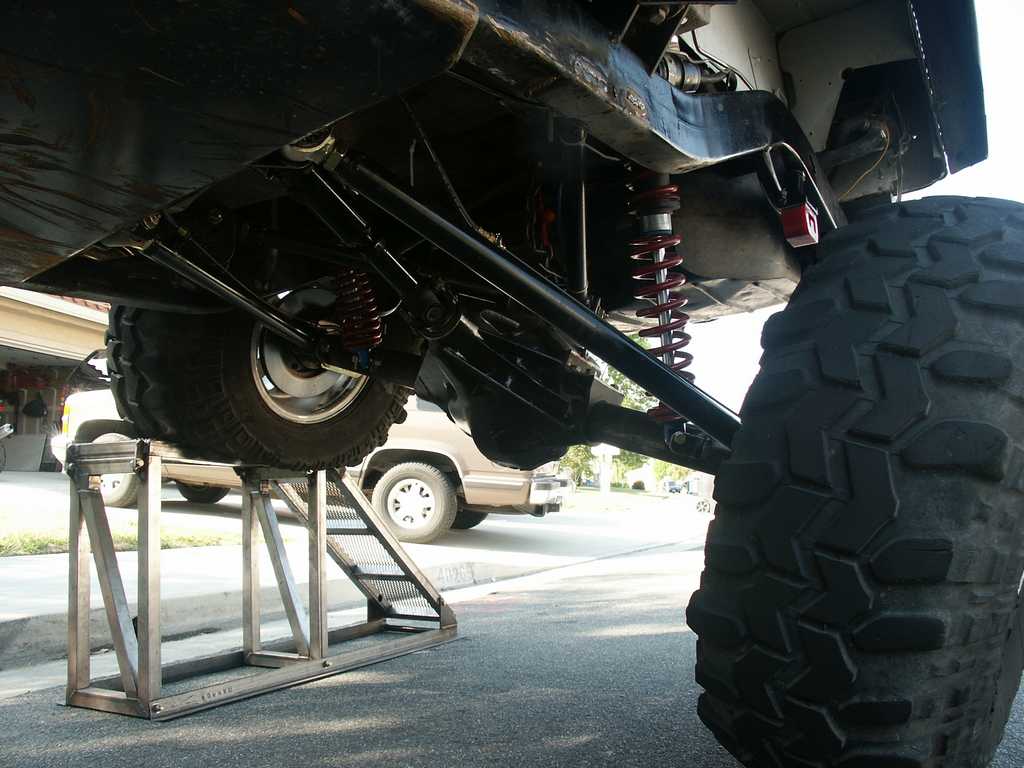
05/15/03 - Lower links installed
I got the lower links installed today. I temporarily put the gas tank
cover back on to see how bad the interference will be. A couple good bumps
and the axle should clear itself :) I also took another picture of the
coil-overs with the good camera :)
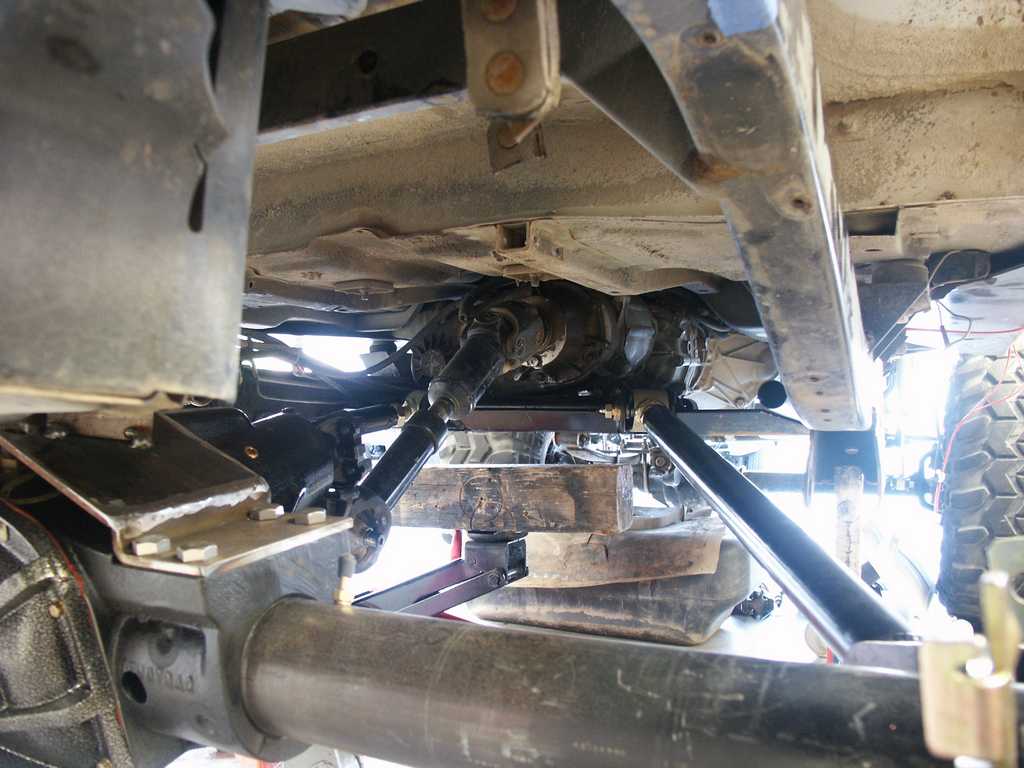


05/19/03 - Upper links progress
I got the passenger side upper frame mount installed today. The drivers
side is all prepared and ready for tomorrow


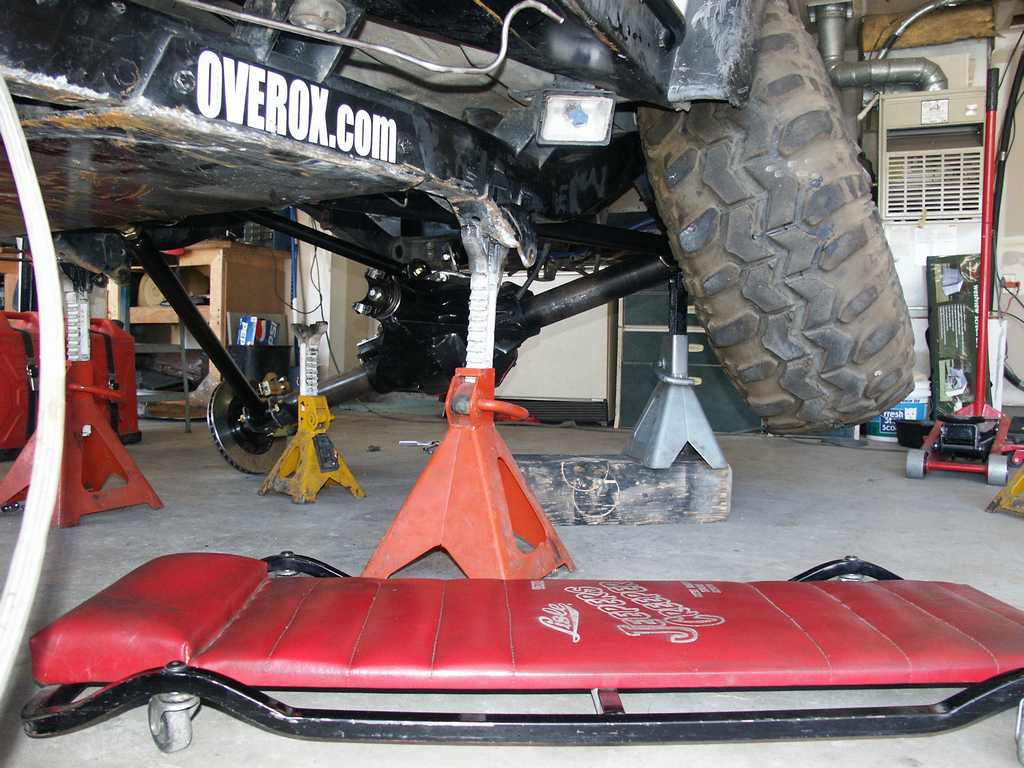
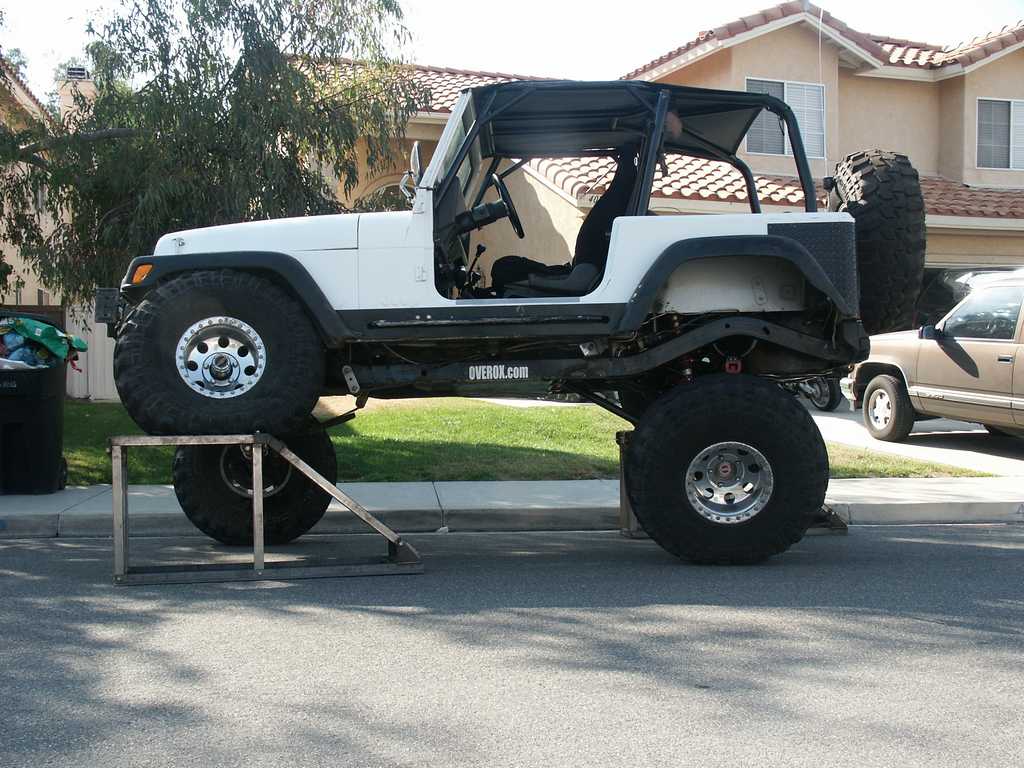
05/24/03 - Drivable
I got everything to the point where the Jeep can drive.... Kinda... I
didn't get to the bump stops, but the plan is to take it easy out at Calico
anyways. Here's some pictures of the axle flexing it's muscles a bit, and
also a couple Natalie helping tighten all the bolts.

05/27/03 - First test drive
I thought I had enough bases covered to test drive the Jeep out at Calico for
Memorial Day Weekend. If I had built and installed bump stops I would have
been almost correct. The coil-overs were installed at a severe angle in
towards each other because that was the fastest and easiest way to get the done
in time. They ended up leaning over at a 60 degree angle from
vertical. That's a SEVERE lean, but I knew it wasn't the end
solution. I also ran the brake lines in a temporary fashion because it was
fast and easy. A single line following the limiting chain. That all
would have worked fine if I had bump stops. On the first test run, the
axle compressed enough to cram the brake line into the gas tank cross member and
it broke. No big deal. I just installed a vice grip on the line and
the fronts worked great. I spent the weekend listening to the lower links
knock against the frame though. Again, because of no bump stops.
Also because the coil-overs weren't effective enough at that lean. Part
way through the weekend I found a ledge to flex things out. I used that
opportunity to adjust the dual rate disc and the overall ride height of the
coil-overs. This worked pretty good for a while, but then it seemed to
collapse down again. I blame the collapse on the angle. At this
point I'm ready to cut the tub and build some hoops inside to mount the
coil-overs, but I do have to try to get the original plan to work first.
That plan was to lean them forward instead of towards each other. My first
attempt seemed to prove that there's not enough room, but it's worth a second
try. Cutting into the tub might mean the end of the dual rear seat.
Here's a couple pictures from the weekend:

I also shot a quick video showing squat and anti-squat (a.k.a.
jack).
 12 seconds, 700KB
05/28/03 - Back into pieces
I took the Jeep back apart today. I've got a list of changes to make
before the next test run. The first one I accomplished was the
bump-stops. I also started laying out where the coil-overs are coming
through the tub.

05/29/03 - Through the tub
Today I cut the tub, made some hoops and made some lower mounts. The
coil-overs are now mounted through the tub. Hopefully it won't be too
difficult to get the back seat to mount back there agian. I test drove the
Jeep around the block and it's 1000x better than the temporary setup. My
spring rate is probably a little too stiff, but that's easy enough to fix.

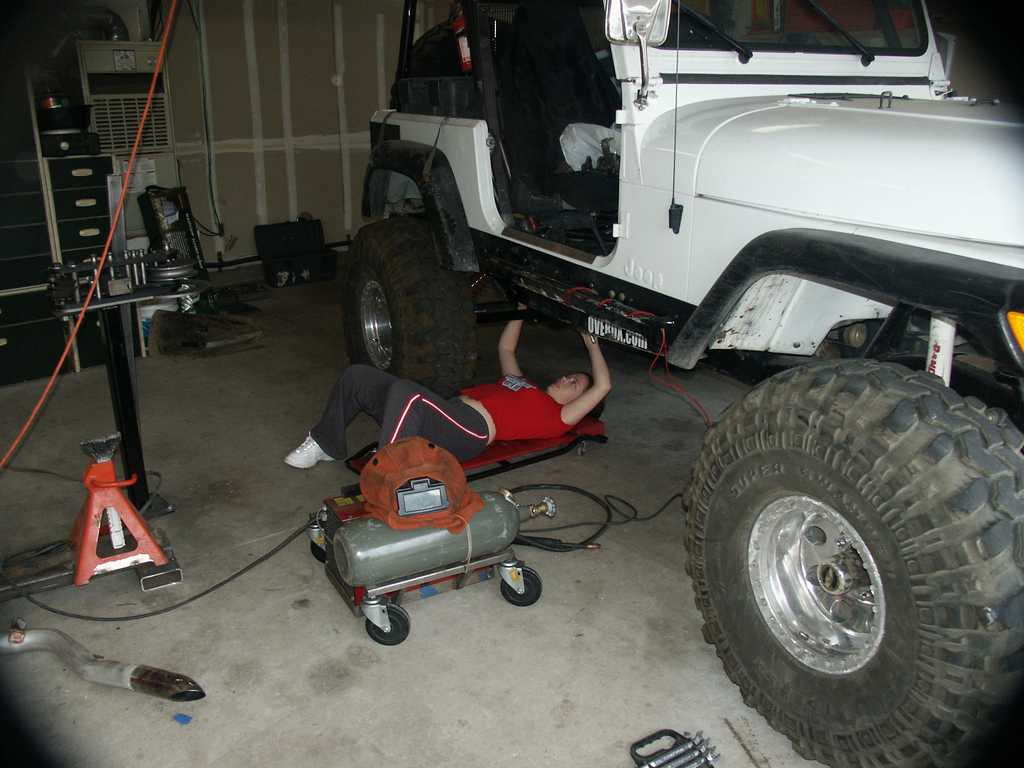
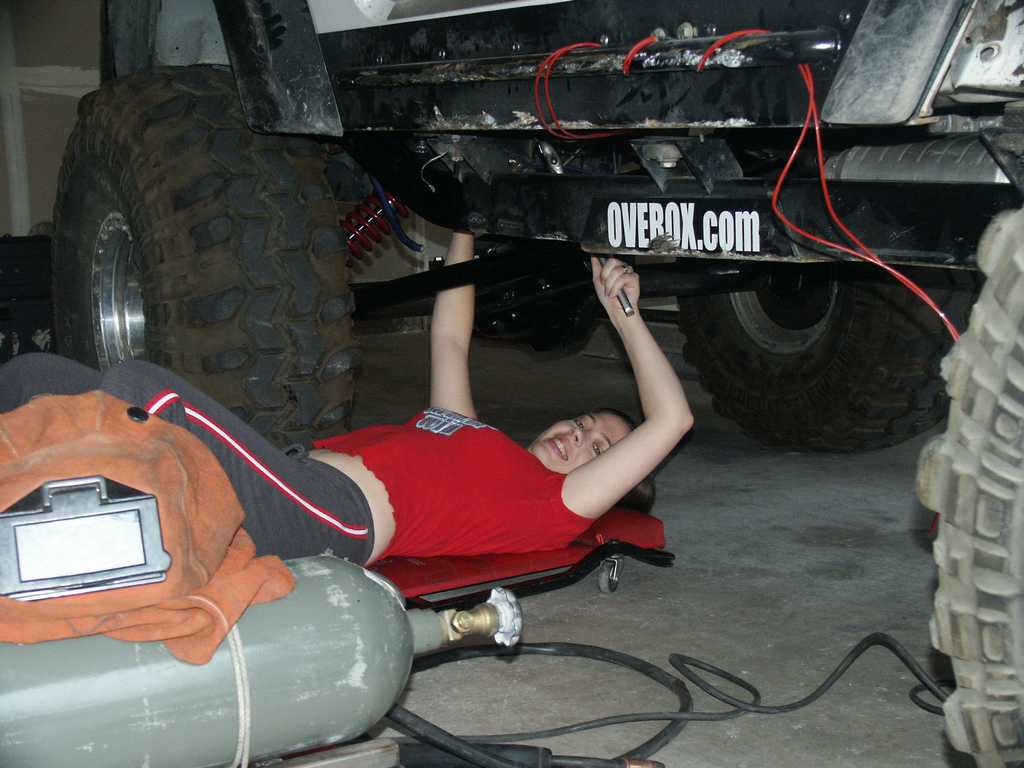
05/30/03 - Brakes & Ramp'd
I ran the rear brake lines today. I used the stock line, through the
firewall up to next to the drivers seat. There I installed the two manual
line-locks. Then I ran under the drivers seat, through to floor, to the
frame end mounts for the lower links (on the skid plate). I ran flex line
past the frame end Johnny Joints, then hard line down the 30" link, then
flex line off the link directly to the rear brake calipers. Worked out
pretty nice. The line-locks aren't quite as good as I'd hoped they'd
be. Also, the driver's side line-lock is difficult to engage. It's
supposed to disengage with a good push on the brake pedal, but only the
passenger side lets go. Hopefully it just needs to "brake" in a
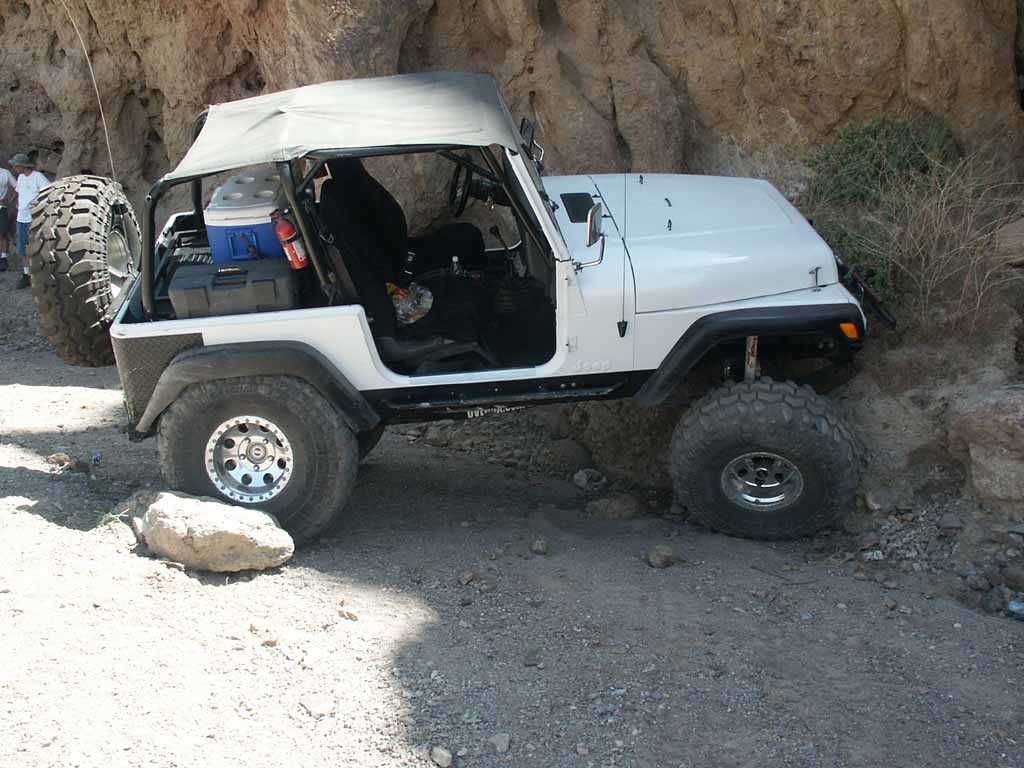
little :) After I had brakes, I NEEDED to see the Jeep up on both
ramps. I ran it up on a single ramp last week but wasn't impressed (hence
no pictures). That was with the temporary coil-over mounts leaned in
toward each other. I was a little more impressed with the single
ramp. Basically, when the front drives up one ramp and the axle leans at a
20* angle, hopefully the vehicle body only leans at 10*. That means that
the front and rear suspensions are balanced and flexing equally. Last week
the rear suspension was doing ALL the work so the front axle was parallel with
the body. It's a little better now, but I might need a sway bar in back to
balance things out.
For now, I've got some pictures of the Jeep up on both
ramps. I have pictures of the Jeep on both ramps, aired down to 5psi and
one tire is about 2" off the ground. Now, all the tires are firmly on
the ground. Maybe later this week I'll ramp it at street pressure to see
if I can get a tire off the ground. That'll give me an indication of how
much more travel I'm getting compared to the SOA setup.

05/31/03 - Details....
Today I worked on some little details. The remote reservoirs needed to be
mounted and I needed a cross bar connecting the rear hoops. The cross bar
seemed like the perfect temporary place for the reservoirs. Later, I want
to work on getting them mounted on the exterior of the tub, perhaps on top of
the frame. I also had a muffler issue that needed help. My rubber
donut that I installed before Calico was too close to the muffler itself, so it
melted. This time I just hard mounted a piece of steel between the exhaust
tip and the side of the frame. Perhaps a temporary solution, perhaps not
:) I got the carpets back installed and it looks pretty clean so
far. The pictures below show the carpeted back, and my line locks.
The line lock closest to the seat is for the passenger side rear tire and the
other is for the driver's side rear tire. The driver's side line lock
still doesn't seem to operate correctly. I'll goof around with it tomorrow
ar Corral Canyon and see if it's worth fixing. I might just end up with
cutting brakes there after all.

06/02/03 - Back into pieces II
I tore the Jeep apart again today. I built in some support on the
bridge. Also, I cleaned up all the dirt, splatters and everything else and
put a coat of paint on there. Then I figured out the best place to mount
the coil-over reservoirs outside the tub. I cleaned up a lot of other
stuff under the Jeep and put a coat of paint on that too. On Sunday, I
took the Jeep for a spin through Corral Canyon. Everything seemed to work
well, except the coils were clanging when a tire drooped way out. I'll
probably end up with tender/helper springs in there, but for now I'm going to
try dialing up the suspension just to the point where the springs are held in
place. I'll see how tall it sits and make a decision then.
06/03/03 - Back together, for the time being
I put the Jeep back together today. I adjusted the coil-overs so the
springs were retained in their positions, but the Jeep sat too high. I
need to get tender/helper springs. Tomorrow I take the coil-overs back out
and drive up to KarTek.
06/04/03 - Coil-overs done?
I took apart the coil-overs today and installed tender springs. They're
supposed to go on top of both coils, with a spacer between the top 400# spring
and the tender spring. The problem was that the spacer had a 2.5" ID
and sat weird on the top adjustable disc on the coil-over. Also, it
"clanked" every time the wheel drooped out, then reset. That's
not much better than no tender spring at all. I decided to put the tender
spring between the 400# coils, on top of the sliding coil separator. This
way I don't need the new spacer, and at $37 per side, that's a nice
savings! I think the coil-overs are pretty much setup the way I want
them. The only thing that might change a little is the dual rate
adjuster. Currently, it's about 2" out. That might be a bit
more than I need. Lowering it down would help level things out in tippy
situations. Anyways, here's today's pictures. In the 2nd picture,
you can see the tender spring (collapsed) between the red coils, just above the
coil separator.


06/05/03 - Back seat in
It was easier than I thought to get the back seat to fit back in the
Jeep. I only had to lift the brackets 1". I welded a piece of
rectangle stock tot he bottom of the factory hinge brackets, and I'll use longer
bolts to hold them down. The seat sits back with just a touch more
recline, but hardly noticeable.
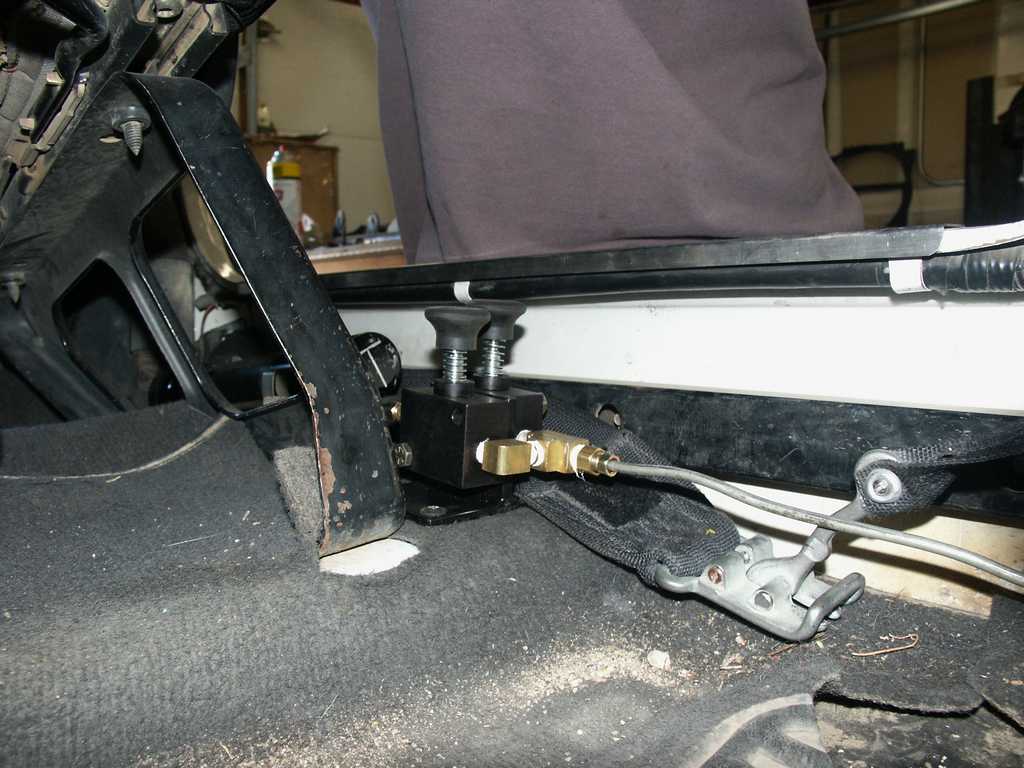
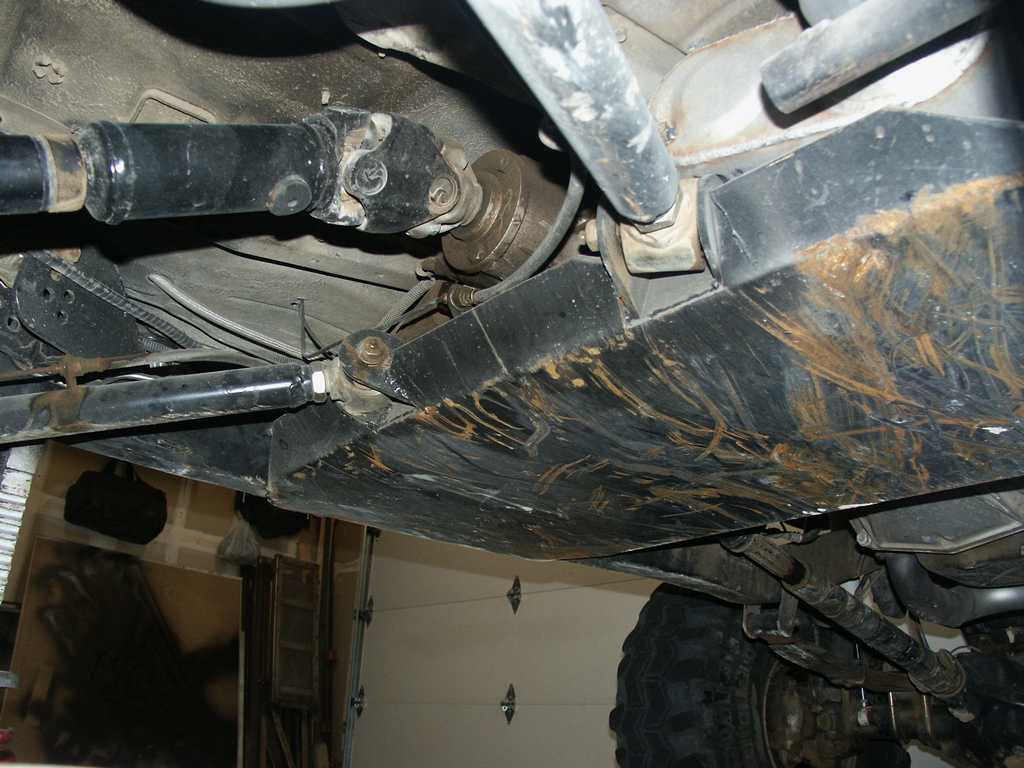
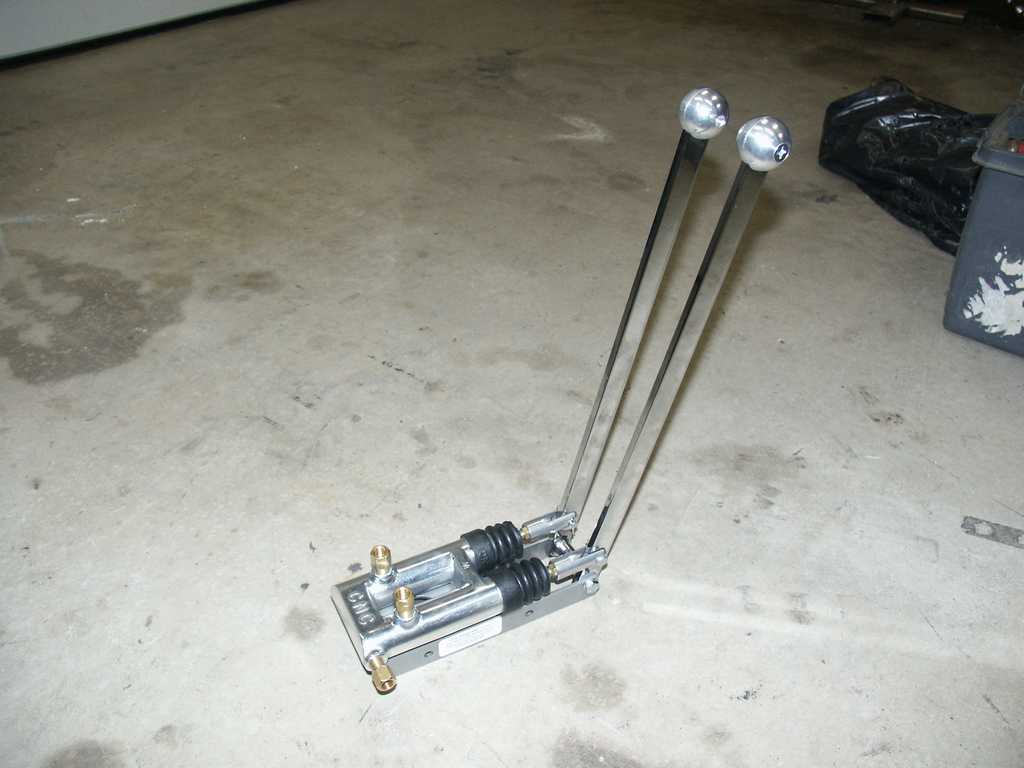
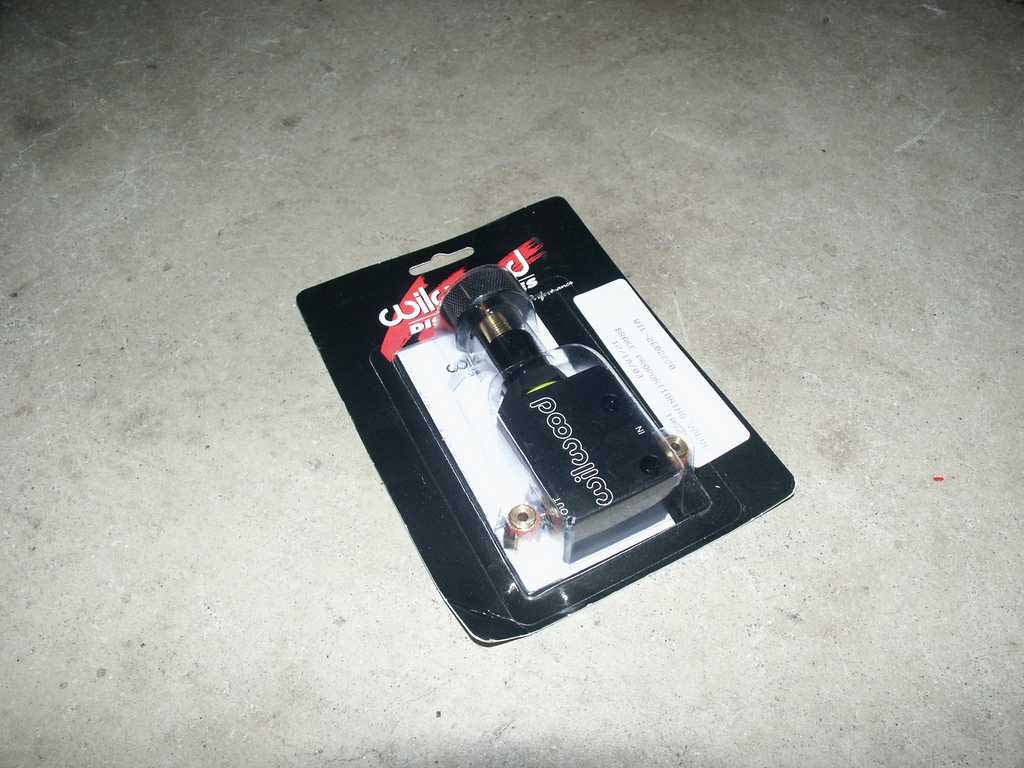
01/07/04 - Skid plate problems
For the past few months I've been noticing that the skid plate has been
taking a beating. The lower links were pushing on the skid plate with more
force than it could handle. I've thought about different ways to support
the skid plate, but finally decided that it just wasn't going to work.
Then I looked for ways to build a cross member to isolate the links from the
skid plate. I thought briefly about making this new cross member a bolt in
unit so it could be removed, but decided against that. The first picture
below shows the skid plate before I moved the links and the next two pictures
shows the new cross member. I also included pictures of my new cutter
brakes and adjustable proportioning valve. The last photo shows my dual
rate spring connector thingy. The driver's side coil connector thingy
broke last weekend when I was out wheeling.

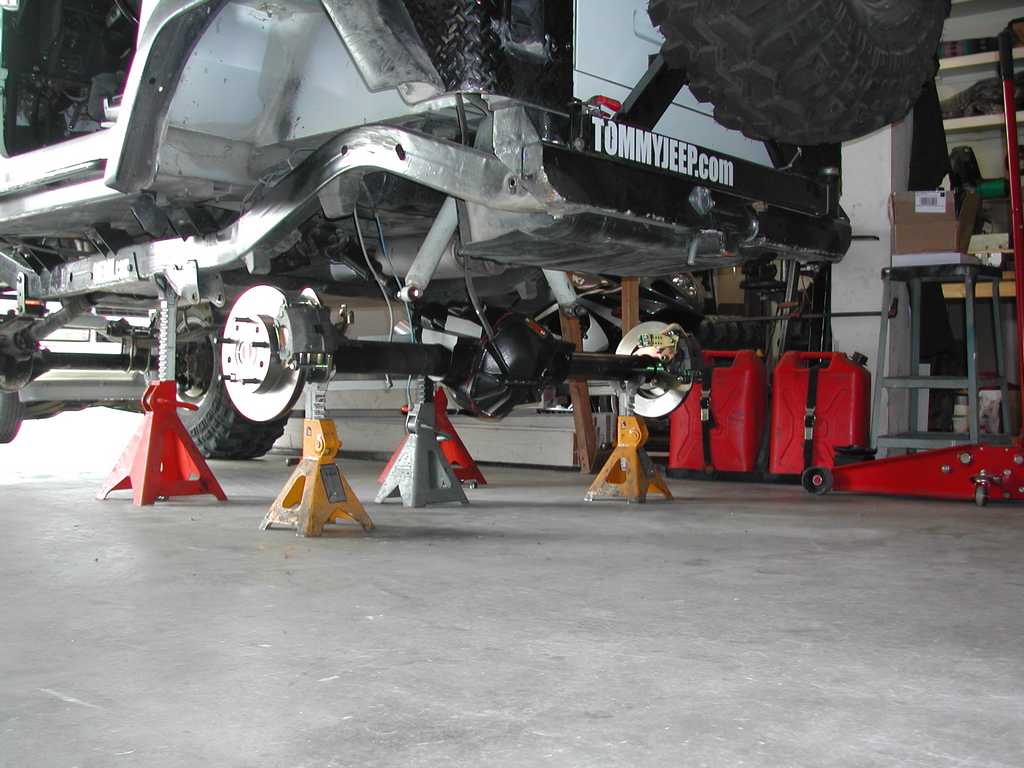
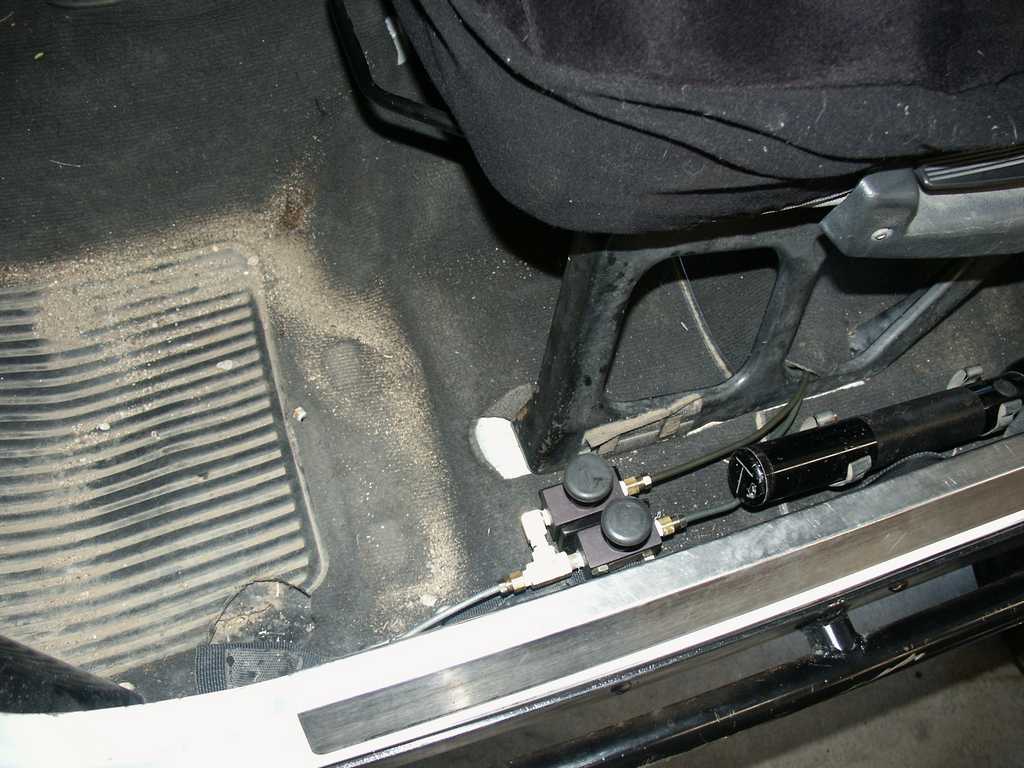
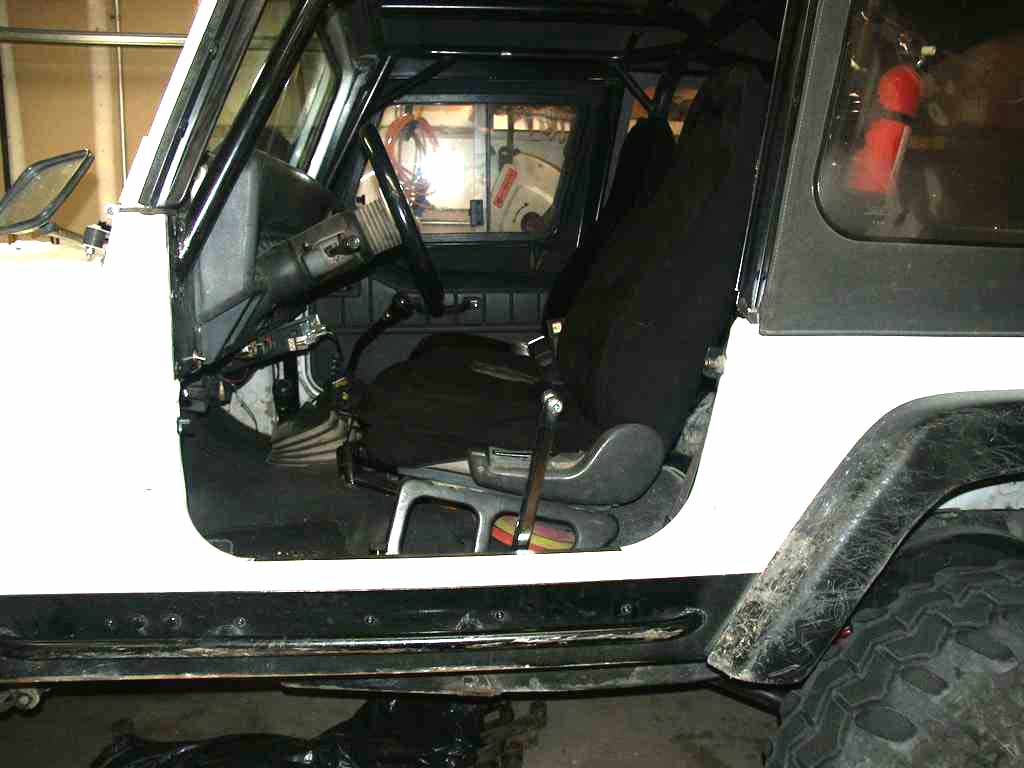
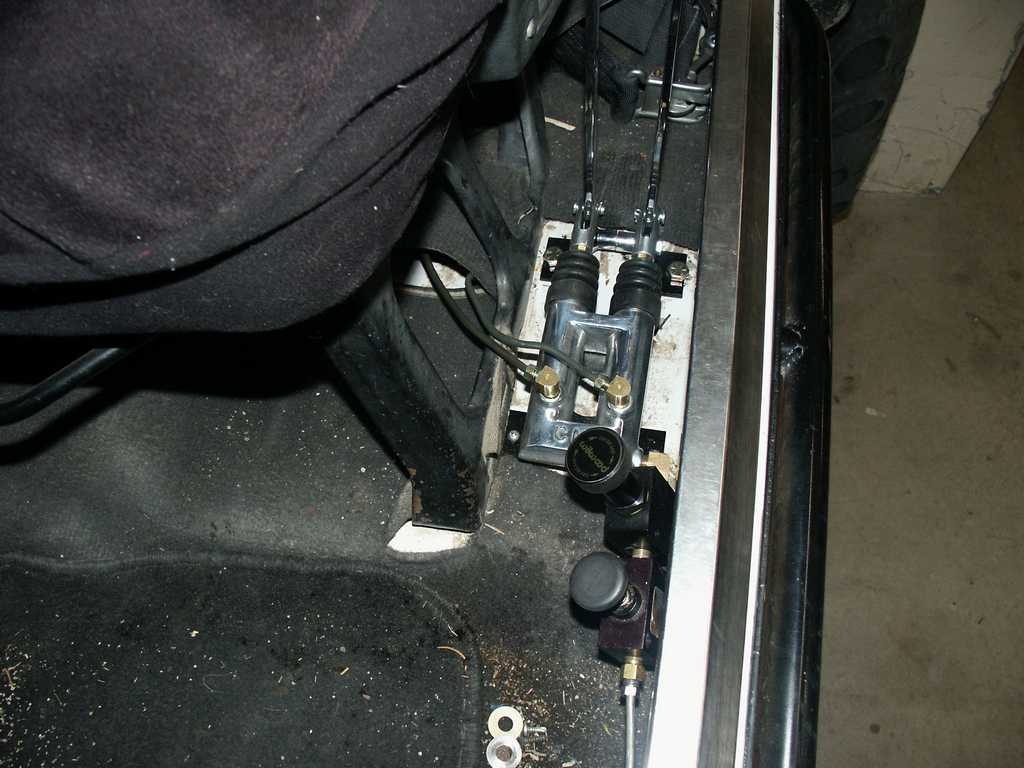
01/08/04 - Brakes complete
Today I finished plumbing the cutting brakes, adjustable proportioning valve
and line lock. I removed the stock proportioning valve and replaced all
the metal brake lines. All the metal work underneath is done, expect for
painting.
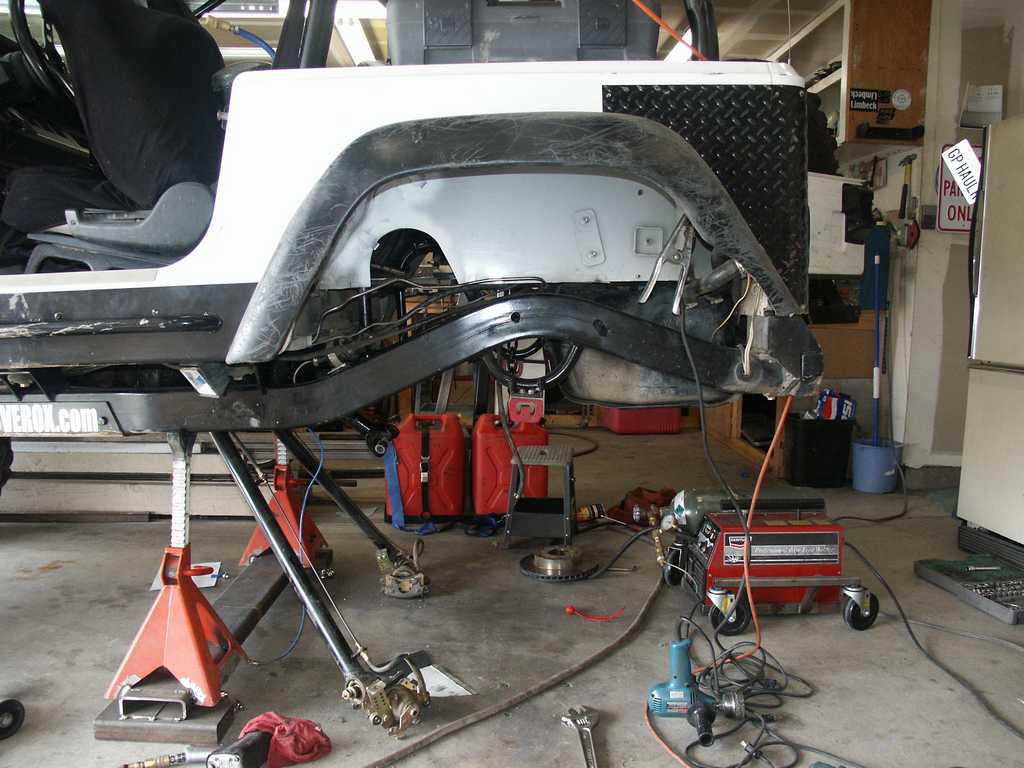
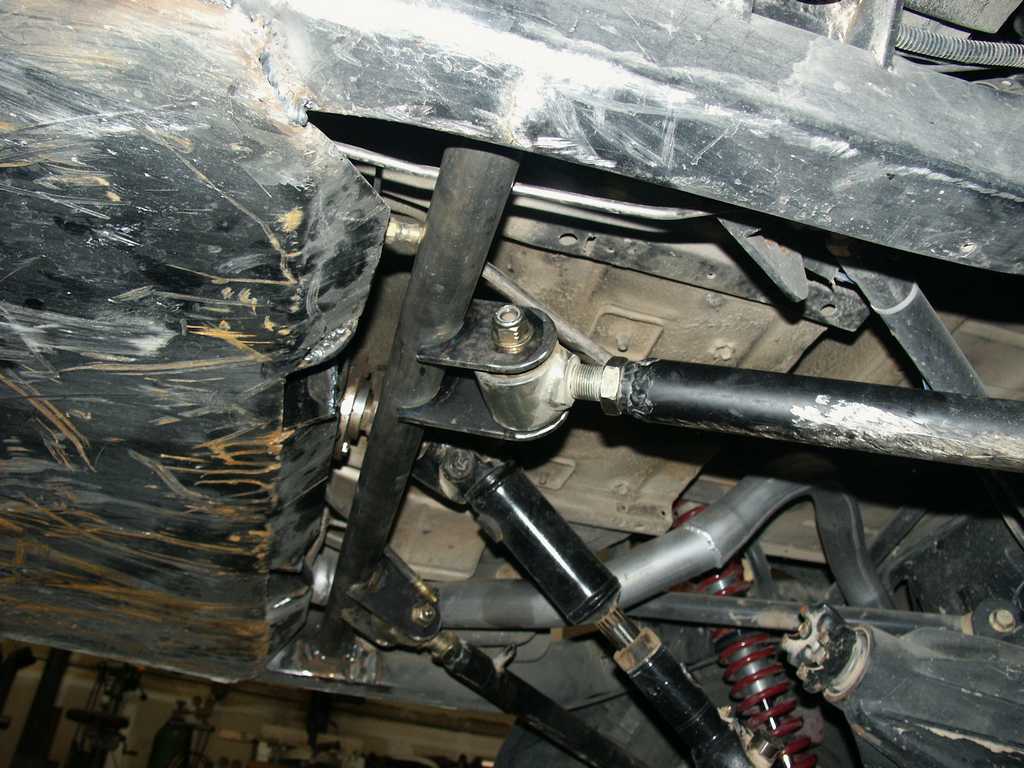
05/22/04 - Re-worked the frame cross member again
While out at Johnson Valley, the frame cross member finally gave way. It
had bent the very first time I was out wheeling with it and I figured that's as
far as it would go. I guess I was wrong. Enough pressure was applied
that it tried to bend more, but that required first ripping from the frame (and
taking a chunk of frame with it). After that failure, the Heep sat in the
garage for a while. After the wife and I got back from Hawaii, I went to
work on repairs. I built exactly the same cross member (1.5"x0.25" wall
DOM tubing sleeved with 1.75"x0.120" wall DOM), but this time I added 45 degree
gussets made from 1.25"x0.25" DOM. Now when power is applied and the link
presses forward on the cross member, it puts the gusset in tension to take the
load.